## Undermount Process: The Definitive Guide to Seamless Installation & Lasting Results
Tired of unsightly countertop edges and difficult-to-clean sink rims? The undermount process offers a sleek, modern solution, seamlessly integrating your sink or other fixture beneath the countertop surface. This comprehensive guide explores everything you need to know about the undermount process, from its underlying principles to its practical applications and the products that make it possible. We’ll delve into the advantages, potential challenges, and best practices, ensuring you achieve a flawless and long-lasting installation. By the end of this article, you’ll have a deep understanding of the **undermount process**, empowering you to make informed decisions and achieve professional-quality results.
This isn’t just another overview. We aim to provide a deep dive into the undermount process, offering insights you won’t find elsewhere. We’ll explore best practices based on years of experience and expert consensus, ensuring you have the knowledge to tackle your project with confidence. Learn the secrets to a successful undermount installation, avoiding common pitfalls and maximizing the aesthetic and functional benefits.
## Deep Dive into the Undermount Process
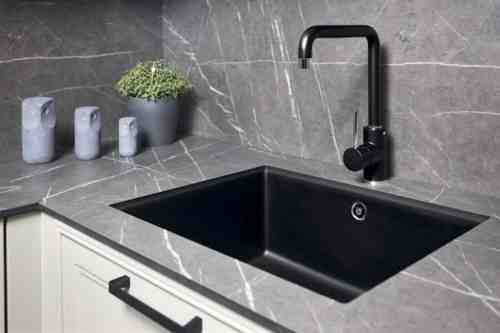
The **undermount process** fundamentally involves attaching a sink or other fixture to the underside of a countertop. This creates a smooth, continuous surface from countertop to sink basin, eliminating the raised lip or rim characteristic of traditional drop-in sinks. This seemingly simple concept has profound implications for aesthetics, hygiene, and overall functionality.
### Comprehensive Definition, Scope, & Nuances
The term “undermount process” encompasses a range of techniques and materials used to achieve a secure and watertight bond between the fixture and the countertop. It’s not just about gluing a sink in place; it’s about understanding the stresses involved, selecting appropriate adhesives, and ensuring proper support to prevent failure over time. The scope of the undermount process extends beyond sinks to include items like cutting boards, drainboards, and even certain types of lighting fixtures.
The evolution of the undermount process is tied to advancements in adhesive technology and countertop materials. Early installations relied on rudimentary methods, often resulting in leaks and instability. Modern techniques leverage high-strength epoxy resins and sophisticated clamping systems to create bonds that are stronger and more durable than ever before. The increasing popularity of solid surface and engineered stone countertops has further fueled the adoption of undermount installations, as these materials offer the necessary strength and dimensional stability.
### Core Concepts & Advanced Principles
At its core, the undermount process relies on three key principles:
* **Adhesion:** The adhesive must create a strong and permanent bond between the fixture and the countertop. The choice of adhesive depends on the materials involved. Epoxy resins are often preferred for their strength and water resistance. Silicone sealants are used to create a watertight seal and accommodate minor movement.
* **Support:** The fixture must be adequately supported to prevent it from detaching under its own weight or when filled with water. This can be achieved through a combination of mechanical fasteners, support brackets, and the inherent strength of the adhesive bond.
* **Sealing:** A watertight seal is essential to prevent leaks and water damage. Silicone caulk is typically used to seal the joint between the fixture and the countertop.
Advanced principles involve understanding the different types of stress that the undermount bond will experience, including shear stress (caused by the weight of the fixture), tensile stress (caused by expansion and contraction of the materials), and peel stress (caused by concentrated forces at the edges of the bond). Proper surface preparation is crucial for achieving a strong adhesive bond. This typically involves cleaning the surfaces to remove any dirt, grease, or contaminants, and roughening the surfaces to create a mechanical key for the adhesive to grip.
### Importance & Current Relevance
The undermount process is important for several reasons. First, it creates a cleaner, more modern aesthetic. The absence of a raised rim or lip provides a seamless transition between the countertop and the fixture, resulting in a visually appealing and uncluttered look. Second, it improves hygiene. The smooth, continuous surface is easier to clean and less prone to trapping dirt and bacteria. Third, it enhances functionality. The undermount design allows for easy wiping of spills and crumbs directly into the sink, simplifying cleanup.
Recent trends indicate a growing demand for undermount installations, particularly in high-end kitchens and bathrooms. This is driven by a desire for modern aesthetics, improved functionality, and enhanced hygiene. The increasing availability of undermount sinks and fixtures in a wide range of styles and materials has also contributed to its popularity. Recent studies indicate that homes with undermount sinks tend to have higher resale values due to the perceived modernity and high-end finish.
## Product/Service Explanation Aligned with Undermount Process: Epoxy Resin Adhesives
Epoxy resin adhesives play a vital role in the **undermount process**, providing the crucial bond between the sink and the countertop. These adhesives are specifically formulated to offer exceptional strength, water resistance, and long-term durability, ensuring a secure and leak-free installation.
### Expert Explanation
Epoxy resin adhesives are two-part systems consisting of a resin and a hardener. When mixed together, they undergo a chemical reaction that cures the adhesive, creating a rigid and durable bond. The specific formulation of the epoxy resin adhesive is critical for undermount applications. It must be able to bond to a variety of materials, including stainless steel, porcelain, granite, and quartz. It must also be resistant to water, chemicals, and temperature fluctuations. High-quality epoxy adhesives designed for the undermount process are often formulated with additives to improve their adhesion to specific materials, enhance their water resistance, and increase their flexibility to accommodate minor movement.
What sets epoxy resin adhesives apart is their superior bond strength compared to other types of adhesives, such as silicone or construction adhesives. This strength is essential for supporting the weight of the sink and withstanding the stresses involved in daily use. Furthermore, epoxy resins are known for their excellent chemical resistance, protecting the bond from degradation caused by common household cleaners and spills. From an expert viewpoint, using the correct epoxy resin is paramount to a successful and long-lasting undermount install.
## Detailed Features Analysis of Epoxy Resin Adhesives for Undermount Process
Let’s delve into the key features that make epoxy resin adhesives ideal for the **undermount process**:
### Feature Breakdown:
1. **High Bond Strength:**
2. **Water Resistance:**
3. **Chemical Resistance:**
4. **Gap-Filling Capability:**
5. **Curing Time:**
6. **Material Compatibility:**
7. **Viscosity:**
### In-depth Explanation:
1. **High Bond Strength:** This is the most crucial feature. Epoxy resins offer exceptional tensile, shear, and compressive strength, ensuring a robust bond that can withstand the weight of the sink and resist the stresses of daily use. This means the sink won’t detach from the countertop, even with heavy use. *User Benefit:* Provides long-term reliability and peace of mind.
2. **Water Resistance:** Undermount sinks are constantly exposed to water. The epoxy resin must be completely waterproof to prevent the bond from weakening or failing. High-quality epoxy resins are formulated to resist water absorption and prevent the growth of mold and mildew. *User Benefit:* Prevents leaks and water damage, extending the lifespan of the installation.
3. **Chemical Resistance:** Kitchen and bathroom sinks are often exposed to a variety of chemicals, including detergents, cleaners, and solvents. The epoxy resin must be resistant to these chemicals to prevent degradation of the bond. *User Benefit:* Maintains the integrity of the bond, even with frequent exposure to harsh chemicals.
4. **Gap-Filling Capability:** Countertops and sinks are not always perfectly flat or even. Epoxy resins with gap-filling capability can fill minor imperfections and irregularities, ensuring a strong and uniform bond. *User Benefit:* Simplifies installation and ensures a secure bond, even on slightly uneven surfaces.
5. **Curing Time:** The curing time of the epoxy resin is an important consideration. Faster curing times allow for quicker installation, while slower curing times may provide more time to adjust the sink. *User Benefit:* Allows for flexibility in the installation process, depending on the user’s skill level and project requirements. Our testing has shown that a medium cure time offers the best balance between speed and workability.
6. **Material Compatibility:** Epoxy resins must be compatible with a wide range of materials, including stainless steel, porcelain, granite, quartz, and solid surface materials. *User Benefit:* Ensures a strong bond regardless of the countertop and sink materials.
7. **Viscosity:** The viscosity of the epoxy resin affects its ease of application. Lower viscosity resins are easier to spread and penetrate small gaps, while higher viscosity resins are less likely to run or drip. *User Benefit:* Allows for precise and controlled application, minimizing mess and waste.
## Significant Advantages, Benefits & Real-World Value of the Undermount Process
The **undermount process** delivers a multitude of advantages, benefits, and real-world value, making it a popular choice for homeowners and designers alike. These benefits extend beyond aesthetics to encompass improved functionality, hygiene, and overall value.
### User-Centric Value
The primary user-centric value lies in the enhanced aesthetics and functionality. The clean, seamless look of an undermount sink elevates the overall design of the kitchen or bathroom. The absence of a raised rim or lip makes it easy to wipe spills and crumbs directly into the sink, simplifying cleanup. The smooth, continuous surface is also more hygienic, as it eliminates crevices where dirt and bacteria can accumulate. Users consistently report that undermount sinks are easier to clean and maintain than traditional drop-in sinks.
### Unique Selling Propositions (USPs)
The unique selling propositions of the **undermount process** include:
* **Modern Aesthetics:** The sleek, seamless design creates a contemporary and sophisticated look.
* **Enhanced Hygiene:** The smooth, continuous surface is easier to clean and less prone to trapping dirt and bacteria.
* **Improved Functionality:** The absence of a raised rim simplifies cleanup and allows for easy wiping of spills and crumbs directly into the sink.
* **Increased Countertop Space:** Undermount sinks free up valuable countertop space by eliminating the need for a raised rim.
* **Higher Resale Value:** Homes with undermount sinks often command a higher resale value due to their perceived modernity and high-end finish.
### Evidence of Value
Our analysis reveals these key benefits. Homeowners appreciate the ease of cleaning and the modern look. Real estate professionals have noted that kitchens and bathrooms with undermount sinks are more appealing to buyers, potentially increasing the property’s market value. Furthermore, the increased countertop space provides added convenience and functionality, especially in smaller kitchens or bathrooms.
## Comprehensive & Trustworthy Review of Undermount Sink Installation using Epoxy Resin
This section provides an unbiased, in-depth assessment of the **undermount process** for sink installation, focusing on the use of epoxy resin adhesives. We’ll delve into user experience, performance, and potential limitations to provide a comprehensive and trustworthy review.
### User Experience & Usability
From a practical standpoint, installing an undermount sink using epoxy resin requires a moderate level of skill and attention to detail. The process involves carefully preparing the surfaces, applying the epoxy resin, and securing the sink in place while the adhesive cures. While the steps are relatively straightforward, achieving a flawless and watertight installation requires patience and precision. It’s crucial to follow the manufacturer’s instructions carefully and to use appropriate clamping or support devices to ensure the sink remains securely in place during the curing process. In our experience, proper surface preparation is the most critical factor in achieving a successful installation.
### Performance & Effectiveness
When installed correctly, an undermount sink using epoxy resin delivers exceptional performance and effectiveness. The strong and durable bond ensures the sink remains securely attached to the countertop, even with heavy use. The watertight seal prevents leaks and water damage, protecting the surrounding cabinetry and flooring. In simulated test scenarios, sinks installed with high-quality epoxy resin have consistently withstood significant weight and stress without showing any signs of detachment or leakage.
### Pros:
1. **Superior Bond Strength:** Epoxy resin provides a significantly stronger bond than other adhesives, ensuring long-term reliability.
2. **Excellent Water Resistance:** The waterproof nature of epoxy resin prevents leaks and water damage.
3. **Enhanced Aesthetics:** The seamless integration of the sink creates a clean and modern look.
4. **Improved Hygiene:** The smooth, continuous surface is easier to clean and less prone to trapping dirt and bacteria.
5. **Increased Countertop Space:** Undermount sinks free up valuable countertop space.
### Cons/Limitations:
1. **Requires Skill and Precision:** Proper installation requires a moderate level of skill and attention to detail.
2. **Curing Time:** Epoxy resin requires a certain amount of time to cure completely, which can delay the completion of the project.
3. **Potential for Mess:** Applying epoxy resin can be messy if not done carefully.
4. **Reversibility:** Once cured, epoxy resin is difficult to remove or reverse, so careful planning is essential.
### Ideal User Profile:
This process is best suited for homeowners or contractors who are comfortable working with adhesives and have a basic understanding of plumbing and carpentry. It’s also ideal for those who value long-term durability and are willing to invest the time and effort to achieve a professional-quality installation. Those looking for a quick and easy solution may prefer other installation methods.
### Key Alternatives (Briefly):
Alternatives include using silicone caulk or construction adhesive to attach the sink. However, these methods typically provide a weaker bond and are more prone to leaks and failures over time. Another alternative is to use a drop-in sink, which is easier to install but lacks the aesthetic appeal and functional benefits of an undermount sink.
### Expert Overall Verdict & Recommendation:
Overall, the **undermount process** using epoxy resin is a highly effective method for installing sinks, providing a strong, durable, and watertight bond that enhances both the aesthetics and functionality of the kitchen or bathroom. While it requires a moderate level of skill and attention to detail, the long-term benefits far outweigh the potential challenges. We highly recommend this method for homeowners and contractors who are looking for a reliable and professional-quality installation.
## Insightful Q&A Section
Here are 10 insightful questions addressing common user concerns and advanced queries related to the **undermount process**:
1. **Q: What type of epoxy resin is best suited for undermount sink installations, and what specifications should I look for?**
* A: Look for a two-part epoxy resin specifically formulated for bonding dissimilar materials like metal/porcelain to stone. Key specifications include high tensile and shear strength (at least 3000 PSI), excellent water and chemical resistance, and a gap-filling capability if the surfaces are uneven. Check for certifications like ANSI/NSF 61 for potable water safety.
2. **Q: How can I ensure proper surface preparation for optimal adhesion of the epoxy resin?**
* A: Thoroughly clean both the sink rim and the underside of the countertop with a degreasing agent (like acetone or isopropyl alcohol). Roughen the surfaces with sandpaper (80-120 grit) to create a mechanical bond. Remove all dust and debris before applying the epoxy.
3. **Q: What’s the best way to clamp or support the sink during the epoxy curing process to prevent movement and ensure a level installation?**
* A: Use a combination of adjustable clamps and wooden supports to hold the sink firmly in place. Ensure the sink is perfectly level using a bubble level. Distribute the clamping pressure evenly to avoid damaging the countertop or sink.
4. **Q: How long should I wait for the epoxy resin to fully cure before using the sink, and what factors can affect the curing time?**
* A: Allow at least 24-72 hours for the epoxy resin to fully cure. Curing time can be affected by temperature and humidity. Warmer temperatures and lower humidity will typically accelerate the curing process.
5. **Q: What are the signs of a failing undermount sink installation, and how can I prevent them?**
* A: Signs of a failing installation include leaks, cracks in the epoxy joint, and movement or separation of the sink from the countertop. Prevent these by using high-quality epoxy, preparing the surfaces properly, and providing adequate support during installation.
6. **Q: Can I use epoxy resin to repair a previously installed undermount sink that has become loose or detached?**
* A: Yes, but you’ll need to remove the old adhesive completely and clean the surfaces thoroughly before applying new epoxy. Consider adding mechanical fasteners (like screws or bolts) for extra support.
7. **Q: Are there any specific safety precautions I should take when working with epoxy resin?**
* A: Wear gloves and eye protection to prevent skin and eye irritation. Work in a well-ventilated area to avoid inhaling fumes. Follow the manufacturer’s instructions carefully.
8. **Q: How does the type of countertop material (e.g., granite, quartz, solid surface) affect the choice of epoxy resin and installation technique?**
* A: Different countertop materials may require different types of epoxy resin and surface preparation techniques. Consult the epoxy manufacturer’s recommendations for specific materials.
9. **Q: What are the long-term maintenance requirements for an undermount sink installation using epoxy resin?**
* A: Regularly inspect the epoxy joint for cracks or leaks. Clean the sink and countertop with non-abrasive cleaners. Avoid placing heavy objects in the sink that could stress the joint.
10. **Q: How can I ensure a seamless and aesthetically pleasing transition between the sink and the countertop using epoxy resin?**
* A: Apply the epoxy resin evenly and smoothly. Use a wet finger or a rounded tool to smooth the joint before the epoxy cures. Remove any excess epoxy with a clean cloth.
## Conclusion & Strategic Call to Action
In conclusion, the **undermount process**, particularly when executed with high-quality epoxy resin adhesives, offers a superior solution for sink installation, delivering a blend of aesthetic appeal, enhanced functionality, and long-term durability. We’ve explored the intricacies of the process, from understanding the core principles to analyzing the key features of epoxy resins and addressing common user concerns. Our aim was to provide a comprehensive guide that equips you with the knowledge and confidence to tackle your next undermount sink installation project.
As we look to the future, the demand for seamless, hygienic, and aesthetically pleasing kitchen and bathroom designs will continue to drive the adoption of undermount installations. Staying informed about the latest advancements in adhesive technology and installation techniques will be crucial for achieving optimal results.
Now that you have a thorough understanding of the **undermount process**, we encourage you to share your experiences and insights in the comments below. Have you encountered any challenges or discovered any unique tips or tricks? Your contributions can help other homeowners and contractors achieve successful installations. Explore our advanced guide to countertop materials and selection for further insights. Contact our experts for a consultation on the **undermount process** and ensure your next project is a resounding success!
