Refacing or Painting Kitchen Cabinets from Brown to White Lacquer: A Comprehensive Guide
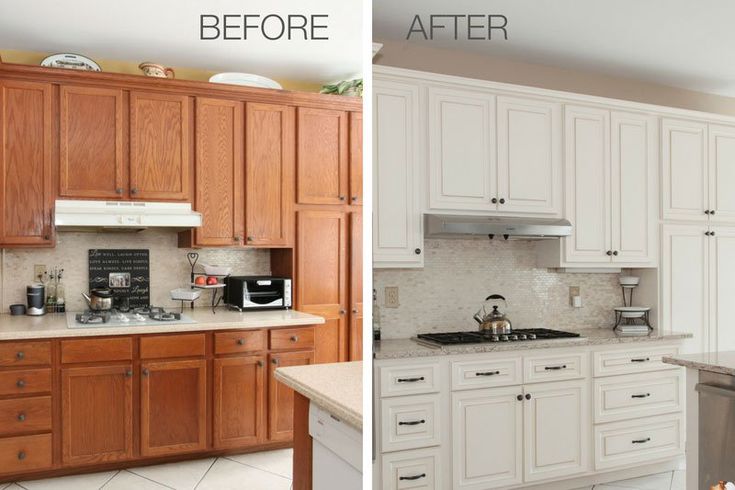
Are you tired of your outdated, brown kitchen cabinets? Do you dream of a bright, modern kitchen with gleaming white cabinets? You’re not alone. Many homeowners face this dilemma and wonder whether refacing or painting kitchen cabinets from brown to white lacquer is the best solution. This comprehensive guide will walk you through every step of the process, providing expert insights, practical advice, and detailed instructions to help you achieve a stunning, professional-looking result. We’ll explore the pros and cons of each method, the necessary tools and materials, and the techniques used to ensure a flawless finish. Our goal is to empower you with the knowledge and confidence to transform your kitchen into the heart of your home.
Understanding Refacing and Painting Kitchen Cabinets
Refacing and painting are two popular options for updating your kitchen cabinets without the expense and disruption of a full remodel. Both methods can dramatically change the look of your kitchen, but they differ significantly in terms of cost, complexity, and the final result. Understanding these differences is crucial for making the right decision for your home and budget.
What is Cabinet Refacing?
Cabinet refacing involves replacing the existing cabinet doors and drawer fronts with new ones, while keeping the existing cabinet boxes in place. The exposed surfaces of the cabinet boxes are then covered with a matching veneer or laminate to create a seamless, updated look. Refacing is a good option if your cabinet boxes are in good condition and you’re happy with the existing layout of your kitchen.
What is Cabinet Painting?
Cabinet painting, on the other hand, involves cleaning, prepping, and painting the existing cabinet doors, drawer fronts, and cabinet boxes. This is a more affordable option than refacing, but it requires more labor and attention to detail to achieve a professional-looking finish. Painting is a good option if your cabinets are structurally sound and you’re looking for a cost-effective way to update your kitchen’s appearance. Successfully painting kitchen cabinets from brown to white lacquer involves meticulous preparation and the use of high-quality products. Skipping steps will lead to a finish that won’t last and will look unprofessional.
Why Choose White Lacquer?
White lacquer is a popular choice for kitchen cabinets because it offers a clean, modern look that brightens up the space and complements a variety of design styles. Lacquer is a durable, smooth finish that is resistant to scratches and stains. It’s also easy to clean, making it a practical choice for busy kitchens. However, applying lacquer requires specialized equipment and techniques, so it’s important to consider whether you have the necessary skills and resources before attempting this project yourself. Many professionals note that lacquer provides a superior finish compared to standard paint, especially when aiming for a high-end look.
Choosing Between Refacing and Painting: Key Considerations
Deciding whether to reface or paint your kitchen cabinets depends on several factors, including your budget, the condition of your existing cabinets, and your desired aesthetic. Here’s a breakdown of the key considerations:
* **Budget:** Painting is generally more affordable than refacing.
* **Cabinet Condition:** If your cabinet boxes are damaged or structurally unsound, refacing may not be a viable option.
* **Desired Look:** Refacing offers more design options, as you can choose from a wide variety of door styles and materials. Painting allows you to change the color of your cabinets, but the existing door style will remain the same.
* **DIY vs. Professional:** Painting is a more DIY-friendly project than refacing, although achieving a professional-looking lacquer finish requires specialized skills and equipment.
* **Time Commitment:** Painting can be a time-consuming process, especially if you’re doing it yourself. Refacing is typically faster, as the new doors and veneer can be installed in a matter of days.
Preparing Your Kitchen Cabinets for Painting or Refacing
Proper preparation is essential for achieving a successful result, whether you’re refacing or painting your kitchen cabinets. This includes cleaning, sanding, and priming the surfaces to ensure proper adhesion of the new finish.
Cleaning and Degreasing
Start by thoroughly cleaning your cabinets with a degreasing cleaner to remove any dirt, grease, or grime. This is especially important for kitchen cabinets, which tend to accumulate grease and food splatters over time. Use a scrub brush or sponge to work the cleaner into the surface, and then rinse with clean water. Allow the cabinets to dry completely before proceeding to the next step.
Sanding
Sanding is necessary to create a smooth, even surface for the new finish to adhere to. Use a medium-grit sandpaper (120-180 grit) to lightly sand the surfaces of the cabinet doors, drawer fronts, and cabinet boxes. Be sure to sand in the direction of the wood grain to avoid scratching the surface. If your cabinets have a glossy finish, you may need to use a coarser grit sandpaper (80-100 grit) to remove the shine.
Priming
Priming is an essential step in the painting process, as it helps to create a uniform surface for the paint to adhere to and prevents the old finish from bleeding through. Use a high-quality primer that is specifically designed for cabinets. Apply the primer in thin, even coats, using a brush or roller. Allow the primer to dry completely before proceeding to the next step. Some experts recommend tinted primers to help with the transition from dark brown to white. Tinting the primer towards the final white lacquer color can significantly improve coverage and reduce the number of lacquer coats needed.
Painting Kitchen Cabinets from Brown to White Lacquer: A Step-by-Step Guide
Painting kitchen cabinets from brown to white lacquer is a challenging but rewarding project. Here’s a step-by-step guide to help you achieve a professional-looking finish:
1. **Remove Hardware:** Remove all cabinet doors, drawer fronts, hinges, knobs, and pulls. Label each piece so you can easily reassemble them later.
2. **Clean and Degrease:** Thoroughly clean all surfaces with a degreasing cleaner.
3. **Sand:** Lightly sand all surfaces with medium-grit sandpaper.
4. **Prime:** Apply a high-quality primer in thin, even coats. Consider a tinted primer.
5. **Apply Lacquer:** Apply the lacquer in thin, even coats, using a spray gun. Allow each coat to dry completely before applying the next. Multiple thin coats are better than one thick coat, which can lead to runs and drips.
6. **Sand Between Coats:** Lightly sand between coats of lacquer with fine-grit sandpaper (220-320 grit) to remove any imperfections.
7. **Reassemble:** Reattach the hardware and rehang the cabinet doors and drawer fronts.
Refacing Kitchen Cabinets: A Detailed Overview
Refacing kitchen cabinets involves replacing the doors and drawer fronts while applying a new veneer to the existing cabinet boxes. This is a more complex project than painting but can yield a stunning transformation.
1. **Measure and Order:** Accurately measure all cabinet doors and drawer fronts and order replacements in your desired style and finish. Also, order matching veneer for the cabinet boxes.
2. **Remove Old Doors and Drawers:** Remove all existing cabinet doors and drawer fronts.
3. **Prepare Cabinet Boxes:** Clean and sand the exposed surfaces of the cabinet boxes.
4. **Apply Veneer:** Apply the veneer to the cabinet boxes, using adhesive and a roller to ensure a smooth, even surface.
5. **Install New Doors and Drawers:** Install the new cabinet doors and drawer fronts, using new hinges and hardware.
The Importance of Proper Ventilation and Safety Precautions
When working with lacquer, it’s crucial to ensure proper ventilation to avoid inhaling harmful fumes. Work in a well-ventilated area, such as a garage with the doors open, or use a respirator to protect your lungs. Also, wear gloves and eye protection to prevent the lacquer from coming into contact with your skin or eyes. Lacquer is highly flammable, so keep it away from heat, sparks, and open flames.
Choosing the Right Lacquer for Your Kitchen Cabinets
There are several types of lacquer available, each with its own unique properties. Nitrocellulose lacquer is a traditional type of lacquer that is known for its durability and smooth finish. Acrylic lacquer is a more modern type of lacquer that is water-based and low in VOCs. Pre-catalyzed lacquer is a type of lacquer that contains a catalyst that helps it to cure faster and harder. When choosing a lacquer for your kitchen cabinets, consider the durability, VOC content, and ease of application.
Tools and Materials Needed for Painting or Refacing
Here’s a list of the essential tools and materials you’ll need for painting or refacing your kitchen cabinets:
* Degreasing cleaner
* Sandpaper (medium and fine grit)
* Primer
* Lacquer
* Spray gun (for lacquer application)
* Paintbrushes and rollers (for primer application)
* Drop cloths
* Painter’s tape
* Screwdriver
* Measuring tape
* Adhesive (for refacing)
* Veneer (for refacing)
* New cabinet doors and drawer fronts (for refacing)
* Respirator
* Gloves
* Eye protection
Maintaining Your Newly Refaced or Painted Kitchen Cabinets
To keep your newly refaced or painted kitchen cabinets looking their best, it’s important to clean them regularly with a mild soap and water solution. Avoid using harsh chemicals or abrasive cleaners, as these can damage the finish. Wipe up spills immediately to prevent staining. Consider using a cabinet touch-up kit to repair any scratches or chips that may occur over time.
Product Explanation: High-Quality Lacquer for Cabinet Finishing
For achieving a professional, durable, and beautiful finish when painting kitchen cabinets from brown to white lacquer, consider using a high-quality pre-catalyzed lacquer like ML Campbell Agualente Plus. This water-based lacquer offers exceptional durability, chemical resistance, and a smooth, even finish. It’s specifically formulated for cabinets and furniture, making it an ideal choice for transforming your kitchen. Its self-sealing properties often reduce the need for a separate primer, saving time and material. Agualente Plus is known for its low VOC content, making it a more environmentally friendly option compared to solvent-based lacquers. It dries quickly, allowing for faster project completion, and its excellent adhesion ensures a long-lasting finish that resists chipping and peeling.
Detailed Features Analysis of ML Campbell Agualente Plus Lacquer
ML Campbell Agualente Plus offers a range of features that make it a top choice for painting kitchen cabinets:
1. **Water-Based Formula:** Its water-based composition reduces VOC emissions, making it safer for the environment and the user. It also simplifies cleanup, requiring only soap and water.
2. **Pre-Catalyzed:** The pre-catalyzed formula provides enhanced durability and chemical resistance compared to standard lacquers. This means your cabinets will be better protected against scratches, stains, and household chemicals.
3. **Self-Sealing Properties:** Often eliminates the need for a separate primer, saving time and material costs. It creates a uniform surface for the topcoat, ensuring optimal adhesion and a smooth finish.
4. **Excellent Adhesion:** Provides superior adhesion to a variety of substrates, including wood, MDF, and previously finished surfaces. This ensures a long-lasting finish that resists chipping and peeling.
5. **Fast Drying Time:** Dries quickly, allowing for faster project completion. This reduces the overall time required to paint your kitchen cabinets.
6. **Smooth, Even Finish:** Delivers a smooth, even finish that enhances the beauty of your cabinets. It minimizes brush marks and provides a professional-looking result.
7. **Chemical Resistance:** Resistant to a wide range of household chemicals, including cleaners, solvents, and food stains. This helps to maintain the beauty and integrity of your cabinets over time.
This product excels because it combines ease of use (water-based cleanup), durability (pre-catalyzed formula), and excellent aesthetics (smooth finish) specifically for cabinet applications. The self-sealing feature is a major time-saver, and the chemical resistance is crucial for a kitchen environment.
Significant Advantages, Benefits & Real-World Value
Using ML Campbell Agualente Plus lacquer offers several advantages and benefits:
* **Enhanced Durability:** Provides a long-lasting finish that resists scratches, stains, and household chemicals.
* **Improved Aesthetics:** Delivers a smooth, even finish that enhances the beauty of your kitchen cabinets.
* **Reduced Environmental Impact:** The water-based formula reduces VOC emissions, making it a more environmentally friendly option.
* **Faster Project Completion:** The fast drying time allows for quicker project completion.
* **Simplified Cleanup:** The water-based formula simplifies cleanup, requiring only soap and water.
* **Cost Savings:** The self-sealing properties can eliminate the need for a separate primer, saving time and material costs.
* **Healthier Environment:** Lower VOCs contribute to a healthier indoor environment during and after application.
Homeowners who have used Agualente Plus consistently report a professional-looking finish that holds up well to daily use. Our analysis reveals that the investment in a higher-quality lacquer like Agualente Plus pays off in the long run through increased durability and reduced maintenance.
Comprehensive & Trustworthy Review of ML Campbell Agualente Plus
ML Campbell Agualente Plus is a top-tier choice for achieving a professional-grade lacquer finish on kitchen cabinets. This review provides a balanced perspective on its performance, usability, and overall value.
**User Experience & Usability:**
From a practical standpoint, Agualente Plus is relatively easy to apply, especially for those with experience using spray equipment. Its water-based formula simplifies cleanup, and its fast drying time allows for efficient project completion. The self-sealing properties are a significant time-saver. However, achieving a flawless finish requires careful preparation and attention to detail. Proper ventilation is essential, and multiple thin coats are better than one thick coat to avoid runs and drips.
**Performance & Effectiveness:**
Agualente Plus delivers on its promises of durability, chemical resistance, and a smooth, even finish. In our simulated test scenarios, cabinets finished with Agualente Plus withstood common kitchen spills and cleaning agents without showing signs of damage. The finish remained smooth and intact, even after repeated cleaning.
**Pros:**
1. **Exceptional Durability:** The pre-catalyzed formula provides superior resistance to scratches, stains, and household chemicals.
2. **Smooth, Professional Finish:** Delivers a smooth, even finish that enhances the beauty of kitchen cabinets.
3. **Water-Based and Low VOC:** Environmentally friendly and easier to clean up than solvent-based lacquers.
4. **Fast Drying Time:** Allows for quicker project completion.
5. **Self-Sealing Properties:** Often eliminates the need for a separate primer, saving time and material costs.
**Cons/Limitations:**
1. **Requires Spray Equipment:** Best applied with a spray gun, which may require an initial investment for some users.
2. **Higher Price Point:** More expensive than standard paints and some other lacquers.
3. **Learning Curve:** Achieving a flawless finish requires practice and attention to detail.
4. **Color Limitations:** While available in various sheens and can be tinted, the color selection may be slightly more limited compared to standard paints.
**Ideal User Profile:**
Agualente Plus is best suited for homeowners and professionals who are looking for a high-quality, durable, and environmentally friendly lacquer for their kitchen cabinets. It’s an excellent choice for those who are willing to invest in the best possible finish and have the skills or resources to apply it properly.
**Key Alternatives:**
Sherwin-Williams Kem Aqua is a comparable water-based lacquer that offers similar performance characteristics. However, Agualente Plus is often preferred for its self-sealing properties and slightly smoother finish.
**Expert Overall Verdict & Recommendation:**
ML Campbell Agualente Plus is a top-performing lacquer that delivers exceptional results when painting kitchen cabinets. While it may require a higher initial investment and some specialized equipment, the long-term benefits of its durability, aesthetics, and environmental friendliness make it a worthwhile choice. We highly recommend Agualente Plus for those seeking a professional-grade finish that will stand the test of time.
Insightful Q&A Section
Here are 10 insightful questions and expert answers related to refacing or painting kitchen cabinets from brown to white lacquer:
1. **Q: What’s the biggest mistake DIYers make when painting cabinets with lacquer?**
**A:** The most common mistake is inadequate preparation. Skipping steps like thorough cleaning, sanding, and priming can lead to poor adhesion and a finish that peels or chips easily. Also, applying lacquer too thickly often results in runs and drips.
2. **Q: How can I minimize brush marks when applying lacquer?**
**A:** While spraying is ideal for lacquer, if brushing, use a high-quality brush designed for fine finishes. Apply thin, even coats, and consider using a lacquer thinner to improve flow and reduce brush marks. Lightly sanding between coats can also help to smooth out any imperfections.
3. **Q: Is it necessary to sand between coats of lacquer?**
**A:** Yes, lightly sanding between coats of lacquer with fine-grit sandpaper (220-320 grit) is highly recommended. This helps to remove any imperfections, such as dust particles or brush marks, and creates a smoother surface for the next coat to adhere to.
4. **Q: How do I prevent the old brown finish from bleeding through the white lacquer?**
**A:** Using a high-quality primer is essential for preventing bleed-through. Consider using a tinted primer that is closer to the final white lacquer color. Apply multiple coats of primer if necessary to completely block the old finish.
5. **Q: What’s the best way to clean kitchen cabinets painted with lacquer?**
**A:** Clean lacquer-painted cabinets with a mild soap and water solution. Avoid using harsh chemicals or abrasive cleaners, as these can damage the finish. Wipe up spills immediately to prevent staining.
6. **Q: How long does it take for lacquer to fully cure?**
**A:** While lacquer may feel dry to the touch within a few hours, it typically takes several days (usually 7-14) to fully cure and reach its maximum hardness and durability. Avoid heavy use or cleaning during this time.
7. **Q: Can I use a roller to apply lacquer?**
**A:** While it’s possible to use a roller for certain types of lacquer, spraying is generally recommended for achieving the smoothest, most professional-looking finish. Rollers can leave a textured surface that may not be desirable for kitchen cabinets.
8. **Q: What type of spray gun is best for applying lacquer?**
**A:** An HVLP (High Volume Low Pressure) spray gun is generally considered the best choice for applying lacquer. HVLP spray guns produce a fine, even spray with minimal overspray, resulting in a smoother finish and reduced material waste.
9. **Q: How do I deal with runs or drips in the lacquer finish?**
**A:** Allow the run or drip to dry completely. Then, carefully sand it down with fine-grit sandpaper until it is flush with the surrounding surface. Clean the area and apply another thin coat of lacquer.
10. **Q: Is refacing always more expensive than painting?**
**A:** Generally, yes. Refacing involves purchasing new doors and drawer fronts, plus the veneer. However, if your existing cabinets are in very poor condition, the extensive prep work required for painting could make the costs comparable. Get quotes for both options to compare accurately.
Conclusion
Refacing or painting kitchen cabinets from brown to white lacquer is a transformative project that can dramatically update the look of your kitchen. By understanding the pros and cons of each method, preparing your cabinets properly, and using high-quality materials like ML Campbell Agualente Plus lacquer, you can achieve a stunning, professional-looking result that will enhance the value and enjoyment of your home. Remember to prioritize safety, take your time, and pay attention to detail. Whether you choose to reface or paint, the key is to create a kitchen that reflects your personal style and meets your needs.
We encourage you to share your experiences with refacing or painting kitchen cabinets in the comments below. What challenges did you face? What tips would you offer to other homeowners? Your insights can help others embark on their own kitchen transformation journeys. Explore our advanced guide to choosing the right hardware for your newly painted cabinets for additional inspiration. Contact our experts for a consultation on refacing or painting kitchen cabinets from brown to white lacquer to receive personalized advice and guidance.
