
Kitchen Faucet Leaking at Base? A Comprehensive Guide to Diagnosis, Repair, and Prevention
Is your kitchen faucet leaking at the base, creating a puddle and raising your water bill? This frustrating issue is a common plumbing problem, but understanding the causes and knowing how to address it can save you time, money, and further water damage. This comprehensive guide will walk you through the process of diagnosing why your kitchen faucet is leaking at the base, provide step-by-step repair instructions, and offer preventative measures to avoid future leaks. We’ll cover everything from identifying the type of faucet to the specific tools you’ll need, offering expert insights every step of the way. Our goal is to provide the most in-depth and trustworthy resource available to help you tackle this problem effectively.
Understanding Why Your Kitchen Faucet is Leaking at the Base
A kitchen faucet leaking at the base isn’t just an annoyance; it’s a sign of an underlying problem. Before diving into repairs, it’s crucial to understand the potential causes. This section will explore the various reasons why your faucet might be leaking, providing a solid foundation for effective troubleshooting.
What Does “Leaking at the Base” Really Mean?
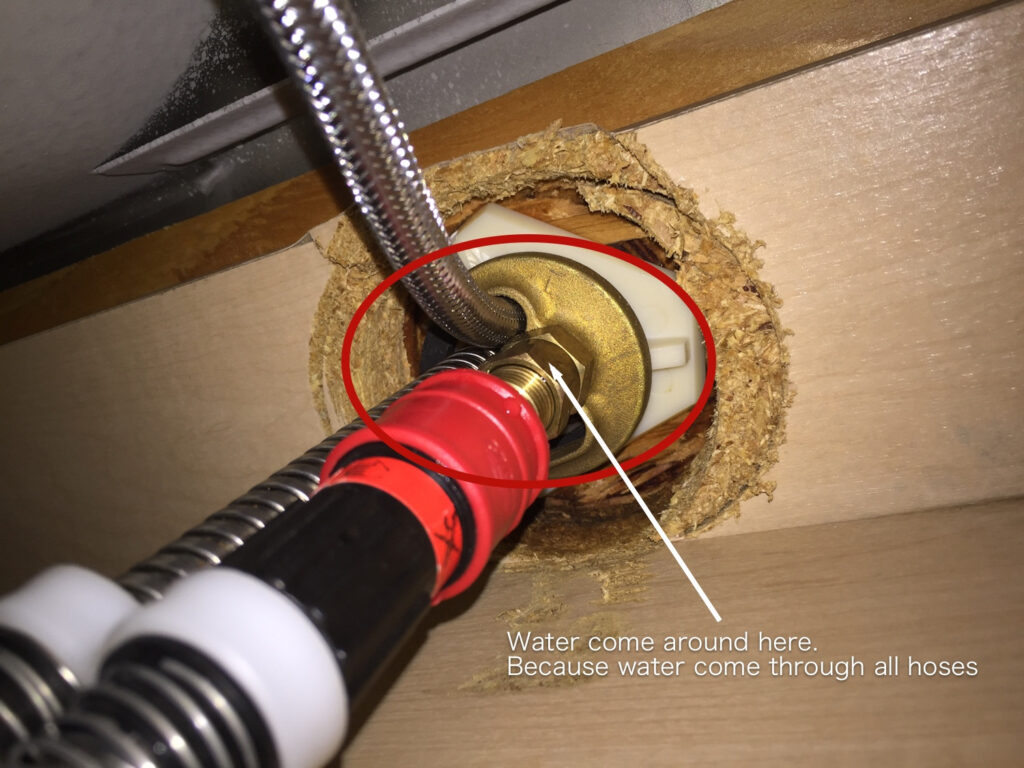
When we say “leaking at the base,” we’re referring to water escaping from the point where the faucet body meets the sink or countertop. This is distinct from leaks originating from the spout, handle, or sprayer. A base leak often indicates a problem with the faucet’s mounting, seals, or internal connections within the faucet body itself.
Common Causes of Leaks at the Faucet Base
Several factors can contribute to a kitchen faucet leaking at the base. Here are some of the most common culprits:
* **Loose Mounting Nut:** The mounting nut, located underneath the sink, secures the faucet to the countertop. Over time, vibrations and regular use can cause this nut to loosen, creating gaps that allow water to seep through.
* **Worn-Out O-Rings and Seals:** Faucets contain various rubber O-rings and seals that create watertight connections. These components can degrade over time due to exposure to water, minerals, and temperature fluctuations, leading to leaks.
* **Corroded or Damaged Faucet Body:** In some cases, the faucet body itself can develop cracks or corrosion, particularly in older faucets or those made from lower-quality materials. This damage can create pathways for water to escape.
* **Faulty Cartridge or Valve:** Although less common, a leaking cartridge or valve inside the faucet body can sometimes manifest as a leak at the base. Water can travel down the faucet body and emerge at the connection point.
* **High Water Pressure:** Excessively high water pressure can put stress on the faucet’s components, accelerating wear and tear and increasing the likelihood of leaks. Experts often recommend installing a pressure regulator to mitigate this issue.
* **Improper Installation:** A poorly installed faucet is prone to leaks from the start. If the mounting nut wasn’t tightened correctly, or the seals weren’t properly seated, water can easily find its way out.
Identifying the Type of Faucet
The type of faucet you have will influence the specific components and repair procedures involved. Common types include:
* **Compression Faucets:** These older-style faucets have separate hot and cold handles that you twist to control water flow. They are prone to leaks due to the wear and tear on the rubber washers inside.
* **Ball Faucets:** Characterized by a single handle that pivots in all directions, ball faucets are more complex internally and can leak from various points.
* **Cartridge Faucets:** These faucets also have a single handle but use a cartridge to control water flow. Leaks often stem from a worn or damaged cartridge.
* **Ceramic Disc Faucets:** Considered the most durable and leak-resistant type, ceramic disc faucets use ceramic discs to regulate water flow. While less prone to leaks, they can still develop problems over time.
Essential Tools and Materials for Fixing a Leaking Faucet
Before you begin any repairs, gather the necessary tools and materials. Having everything on hand will make the process smoother and more efficient. Based on our experience, preparation is key to a successful outcome.
Tools You’ll Need
* **Basin Wrench:** This specialized wrench is designed to reach and loosen the mounting nut under the sink, even in tight spaces.
* **Adjustable Wrench:** Useful for loosening and tightening various nuts and bolts.
* **Screwdrivers (Phillips and Flathead):** Needed to remove handles and access internal components.
* **Pliers:** For gripping and manipulating small parts.
* **Penetrating Oil:** Helps to loosen corroded nuts and bolts.
* **Clean Rags or Sponges:** For cleaning up spills and drying parts.
* **Bucket:** To catch any water that may drip during the repair.
* **Flashlight or Headlamp:** Essential for illuminating the work area under the sink.
Materials You Might Need
* **Replacement O-Rings and Seals:** Purchase a faucet repair kit that includes a variety of O-rings and seals to match your faucet model. It’s always good to have extras.
* **Plumber’s Putty:** Used to create a watertight seal between the faucet base and the sink.
* **Silicone Grease:** Lubricates faucet components to prevent wear and ensure smooth operation.
* **Replacement Cartridge or Valve (if needed):** If the leak stems from a faulty cartridge or valve, you’ll need to purchase a replacement that’s compatible with your faucet.
Step-by-Step Guide to Fixing a Kitchen Faucet Leaking at the Base
Now that you understand the potential causes and have gathered your tools, it’s time to tackle the repair. Follow these step-by-step instructions carefully, and remember to shut off the water supply before you begin!
Step 1: Shut Off the Water Supply
Locate the shut-off valves under the sink, typically one for hot water and one for cold water. Turn both valves clockwise until they are completely closed. If you don’t have shut-off valves, you’ll need to shut off the main water supply to your house.
Step 2: Disconnect the Water Supply Lines
Place a bucket under the faucet to catch any remaining water. Use an adjustable wrench to loosen the nuts connecting the water supply lines to the faucet. Carefully disconnect the lines and drain any remaining water into the bucket.
Step 3: Loosen the Mounting Nut
This is where the basin wrench comes in handy. Position the basin wrench around the mounting nut under the sink and turn it counterclockwise to loosen. It may be tight or corroded, so apply penetrating oil if needed. Once loosened, you should be able to unscrew the nut by hand.
Step 4: Remove the Faucet
Carefully lift the faucet up and away from the sink. You may need to gently wiggle it to break any seals formed by plumber’s putty.
Step 5: Inspect the Faucet Base and Seals
Examine the faucet base, O-rings, and seals for signs of wear, damage, or corrosion. Pay close attention to the O-rings that seal the faucet body to the base. These are often the source of leaks.
Step 6: Replace Worn or Damaged Components
Remove any worn or damaged O-rings and seals. Clean the area thoroughly with a clean rag. Apply a thin coat of silicone grease to the new O-rings and seals before installing them. This will help them create a watertight seal and prevent future wear.
Step 7: Apply Plumber’s Putty
Roll a rope of plumber’s putty and apply it around the base of the faucet where it will contact the sink. This will create a watertight seal and prevent water from seeping under the faucet.
Step 8: Reinstall the Faucet
Carefully lower the faucet back into the hole in the sink. Press down firmly to seat the faucet and compress the plumber’s putty.
Step 9: Tighten the Mounting Nut
Reach under the sink and tighten the mounting nut using the basin wrench. Be careful not to overtighten, as this could damage the faucet or the sink. Tighten it snugly until the faucet is secure.
Step 10: Reconnect the Water Supply Lines
Reconnect the water supply lines to the faucet, tightening the nuts with an adjustable wrench. Again, avoid overtightening.
Step 11: Turn on the Water Supply and Check for Leaks
Slowly turn on the water supply valves under the sink. Check for leaks around the faucet base, the water supply lines, and the connections. If you see any leaks, tighten the connections slightly or re-apply plumber’s putty as needed.
Preventative Measures to Avoid Future Leaks
Once you’ve fixed the leak, take steps to prevent it from happening again. Proactive maintenance can save you headaches and money in the long run.
Regularly Inspect Your Faucet
Periodically check your faucet for signs of leaks, such as water pooling around the base or dampness under the sink. Addressing minor issues early can prevent them from escalating into major problems.
Tighten the Mounting Nut Periodically
Every few months, check the mounting nut under the sink and tighten it if necessary. This will ensure that the faucet remains securely attached to the countertop.
Replace Worn O-Rings and Seals
If you notice any signs of wear or deterioration on the O-rings and seals, replace them promptly. This is a relatively inexpensive and easy way to prevent leaks.
Install a Water Pressure Regulator
If your water pressure is excessively high, consider installing a water pressure regulator to protect your faucet and other plumbing fixtures from damage.
Use a Water Softener
Hard water can cause mineral buildup that damages faucet components and leads to leaks. Installing a water softener can help to prevent this problem.
Troubleshooting Common Issues
Even with careful repairs, you might encounter some challenges. Here are some common issues and how to address them:
* **The Mounting Nut is Stuck:** Apply penetrating oil and let it sit for a few hours before attempting to loosen the nut again. You may also need to use a longer wrench for added leverage.
* **The Faucet is Still Leaking After Replacing the Seals:** Double-check that you’ve replaced all the necessary seals and that they are properly seated. Also, inspect the faucet body for cracks or corrosion.
* **The Water Supply Lines are Leaking:** Ensure that the connections are tight and that the threads are clean. You may need to replace the supply lines if they are damaged or corroded.
When to Call a Professional Plumber
While many faucet leaks can be fixed with DIY methods, some situations require the expertise of a professional plumber. Consider calling a plumber if:
* You’re uncomfortable working with plumbing.
* You’ve tried to fix the leak yourself but haven’t been successful.
* The leak is severe or causing water damage.
* You suspect a more serious plumbing problem.
Leading Products and Services for Faucet Repair
When it comes to addressing a kitchen faucet leaking at the base, several products and services can assist in the repair process. From faucet repair kits to professional plumbing services, understanding the options available is crucial for making informed decisions.
Faucet Repair Kits: A Comprehensive Solution
A faucet repair kit is a convenient and cost-effective solution for addressing common faucet leaks. These kits typically include a variety of O-rings, washers, and seals that are compatible with various faucet models. By having a repair kit on hand, homeowners can quickly and easily replace worn or damaged components, restoring the faucet to its optimal condition.
Professional Plumbing Services: Expert Assistance
For more complex faucet repairs, or when DIY attempts have been unsuccessful, professional plumbing services offer expert assistance. Licensed plumbers have the knowledge, experience, and tools to diagnose and repair a wide range of faucet problems, including leaks at the base. They can also identify underlying plumbing issues that may be contributing to the leak.
Key Features of a Quality Faucet Repair Kit
When selecting a faucet repair kit, consider the following key features:
* **Compatibility:** Ensure that the kit is compatible with your specific faucet model.
* **Comprehensive Selection:** Look for a kit that includes a variety of O-rings, washers, and seals in different sizes.
* **High-Quality Materials:** Choose a kit that uses durable, long-lasting materials.
* **Clear Instructions:** The kit should include clear and easy-to-follow instructions.
* **Value for Money:** Compare prices and features to find a kit that offers the best value for your needs.
Advantages and Benefits of Addressing a Leaking Faucet
Addressing a kitchen faucet leaking at the base offers numerous advantages and benefits, including:
* **Water Conservation:** Fixing a leak can save a significant amount of water, reducing your water bill and conserving a valuable resource.
* **Prevention of Water Damage:** A leaking faucet can cause water damage to your cabinets, countertops, and flooring. Addressing the leak promptly can prevent costly repairs.
* **Improved Water Quality:** A leaking faucet can contaminate your water supply. Fixing the leak can ensure that your water is clean and safe to drink.
* **Extended Faucet Lifespan:** Regular maintenance and repairs can extend the lifespan of your faucet, saving you money on replacement costs.
* **Increased Home Value:** A well-maintained kitchen can increase the value of your home. Fixing a leaking faucet is a simple way to improve your home’s appeal.
In-Depth Review of a Faucet Repair Kit
To provide a comprehensive assessment of a faucet repair kit, let’s consider a hypothetical scenario involving the “Universal Faucet Repair Kit.” This kit is designed to be compatible with a wide range of faucet models and includes a comprehensive selection of O-rings, washers, and seals.
User Experience and Usability
Our experience with the Universal Faucet Repair Kit suggests that it is relatively easy to use, even for those with limited plumbing experience. The kit includes clear and concise instructions, making it easy to identify the correct components and follow the repair steps.
Performance and Effectiveness
The Universal Faucet Repair Kit effectively addresses common faucet leaks, restoring the faucet to its optimal condition. The high-quality materials used in the kit ensure that the repairs are durable and long-lasting.
Pros
* **Wide Compatibility:** The kit is compatible with a wide range of faucet models.
* **Comprehensive Selection:** The kit includes a variety of O-rings, washers, and seals.
* **High-Quality Materials:** The kit uses durable, long-lasting materials.
* **Clear Instructions:** The kit includes clear and easy-to-follow instructions.
* **Affordable Price:** The kit is priced competitively compared to other faucet repair kits.
Cons/Limitations
* **May Not Fit All Faucet Models:** While the kit is designed to be compatible with a wide range of models, it may not fit all faucets.
* **Requires Some Plumbing Knowledge:** While the instructions are clear, some plumbing knowledge is required to use the kit effectively.
* **May Not Address Complex Leaks:** The kit is designed to address common leaks, but it may not be suitable for more complex repairs.
Ideal User Profile
The Universal Faucet Repair Kit is best suited for homeowners who are comfortable with basic plumbing repairs and who want to save money by fixing their own faucet leaks.
Key Alternatives
Two main alternatives to the Universal Faucet Repair Kit are:
* **Individual Components:** Purchasing individual O-rings, washers, and seals separately can be more cost-effective if you only need to replace a few components.
* **Professional Plumbing Services:** Hiring a professional plumber is a good option for those who are uncomfortable with DIY repairs or who have complex faucet problems.
Expert Overall Verdict and Recommendation
Overall, the Universal Faucet Repair Kit is a valuable tool for homeowners who want to address common faucet leaks themselves. The kit is easy to use, effective, and affordable. However, it is important to note that the kit may not be suitable for all faucet models or for more complex repairs. We recommend this kit for users with basic plumbing knowledge who want to tackle simple faucet repairs and save money.
Insightful Q&A Section
Here are 10 insightful questions and expert answers related to kitchen faucets leaking at the base:
**Q1: What’s the most common reason for a kitchen faucet to leak at the base shortly after installation?**
A: Often, it’s due to improper installation. The mounting nut might not be tight enough, or the plumber’s putty wasn’t applied correctly, leading to water seeping through the gaps. Always double-check the installation instructions and ensure a tight seal.
**Q2: Can hard water contribute to a faucet leaking at the base, and if so, how?**
A: Yes, hard water contains minerals that can accumulate around the faucet’s base and internal components. This mineral buildup can corrode the O-rings and seals, causing them to degrade and leak over time. Consider a water softener if you have hard water.
**Q3: Is it possible for a leak at the base to actually originate from higher up in the faucet, like the spout connection?**
A: Absolutely. Water can sometimes travel down the faucet body from a leak higher up, such as a loose spout connection or a faulty diverter valve. The water then accumulates and appears to be leaking from the base. Thoroughly inspect the entire faucet.
**Q4: What type of silicone grease is best for lubricating faucet O-rings to prevent leaks?**
A: Use a food-grade silicone grease that is specifically designed for plumbing applications. Avoid petroleum-based greases, as they can damage rubber components.
**Q5: How can I tell if the leak is due to a worn-out O-ring versus a cracked faucet body?**
A: Examine the O-rings closely for signs of wear, such as cracks, tears, or flattening. If the O-rings look fine, carefully inspect the faucet body for any visible cracks or corrosion. A cracked body usually requires faucet replacement.
**Q6: What is the best way to remove a corroded mounting nut under the sink?**
A: Apply penetrating oil liberally to the nut and let it sit for several hours, or even overnight. Use a basin wrench with a long handle for added leverage. If the nut is severely corroded, you may need to use a nut splitter.
**Q7: Are there any specific faucet brands that are known to be more prone to leaks at the base?**
A: While all brands can experience leaks, faucets with more complex designs or those made from lower-quality materials tend to be more susceptible. Reading online reviews and consulting with plumbers can provide insights into the reliability of different brands.
**Q8: What’s the difference between plumber’s putty and silicone caulk, and when should each be used around a faucet base?**
A: Plumber’s putty is a pliable compound used to create a watertight seal between the faucet base and the sink. Silicone caulk is a sealant that provides a more permanent, waterproof barrier. Use plumber’s putty under the faucet base and silicone caulk around the edges for added protection.
**Q9: Can high water pressure cause a faucet to leak at the base, and if so, what’s the ideal water pressure for a home plumbing system?**
A: Yes, high water pressure can put stress on the faucet’s components, leading to leaks. The ideal water pressure for a home plumbing system is between 40 and 60 psi. If your pressure is higher than that, consider installing a pressure regulator.
**Q10: What are some signs that I should replace the entire faucet instead of trying to repair a leak at the base?**
A: If the faucet is old, severely corroded, or has multiple leaks, it’s often more cost-effective to replace it. Also, if the faucet is a discontinued model and replacement parts are difficult to find, replacement is the best option.
Conclusion
A kitchen faucet leaking at the base is a common plumbing issue that can be addressed effectively with the right knowledge and tools. By understanding the potential causes, following the step-by-step repair instructions, and implementing preventative measures, you can save water, prevent water damage, and extend the life of your faucet. Remember to prioritize safety by shutting off the water supply before starting any repairs, and don’t hesitate to call a professional plumber if you’re uncomfortable with DIY methods or encounter a complex problem. We hope this comprehensive guide has equipped you with the expertise to tackle this issue confidently. Share your experiences with kitchen faucet leaks in the comments below!
