How to Fix a Leaking Sink: A Step-by-Step Expert Guide
Are you tired of that constant drip, drip, drip coming from under your kitchen or bathroom sink? A leaking sink isn’t just annoying; it can also lead to water damage, mold growth, and wasted money. The good news is that many sink leaks are easy to fix yourself with a few basic tools and a little know-how. This comprehensive guide will walk you through the process of how to fix a leaking sink, from identifying the source of the leak to making the necessary repairs. We’ll provide expert tips, detailed instructions, and troubleshooting advice to help you tackle this common plumbing problem with confidence.
We’ve compiled years of experience and consulted with plumbing professionals to create the ultimate resource on fixing leaking sinks. In this guide, you’ll discover the most common causes of sink leaks, learn how to diagnose the problem accurately, and master the techniques for repairing or replacing faulty components. Whether you’re a seasoned DIY enthusiast or a complete beginner, this guide will empower you to stop that leak and save yourself a costly plumbing bill.
Understanding Sink Leaks: A Comprehensive Overview
A leaking sink can stem from various sources, each requiring a specific approach to diagnose and repair. Understanding the anatomy of your sink and the common culprits behind leaks is the first step towards a successful fix.
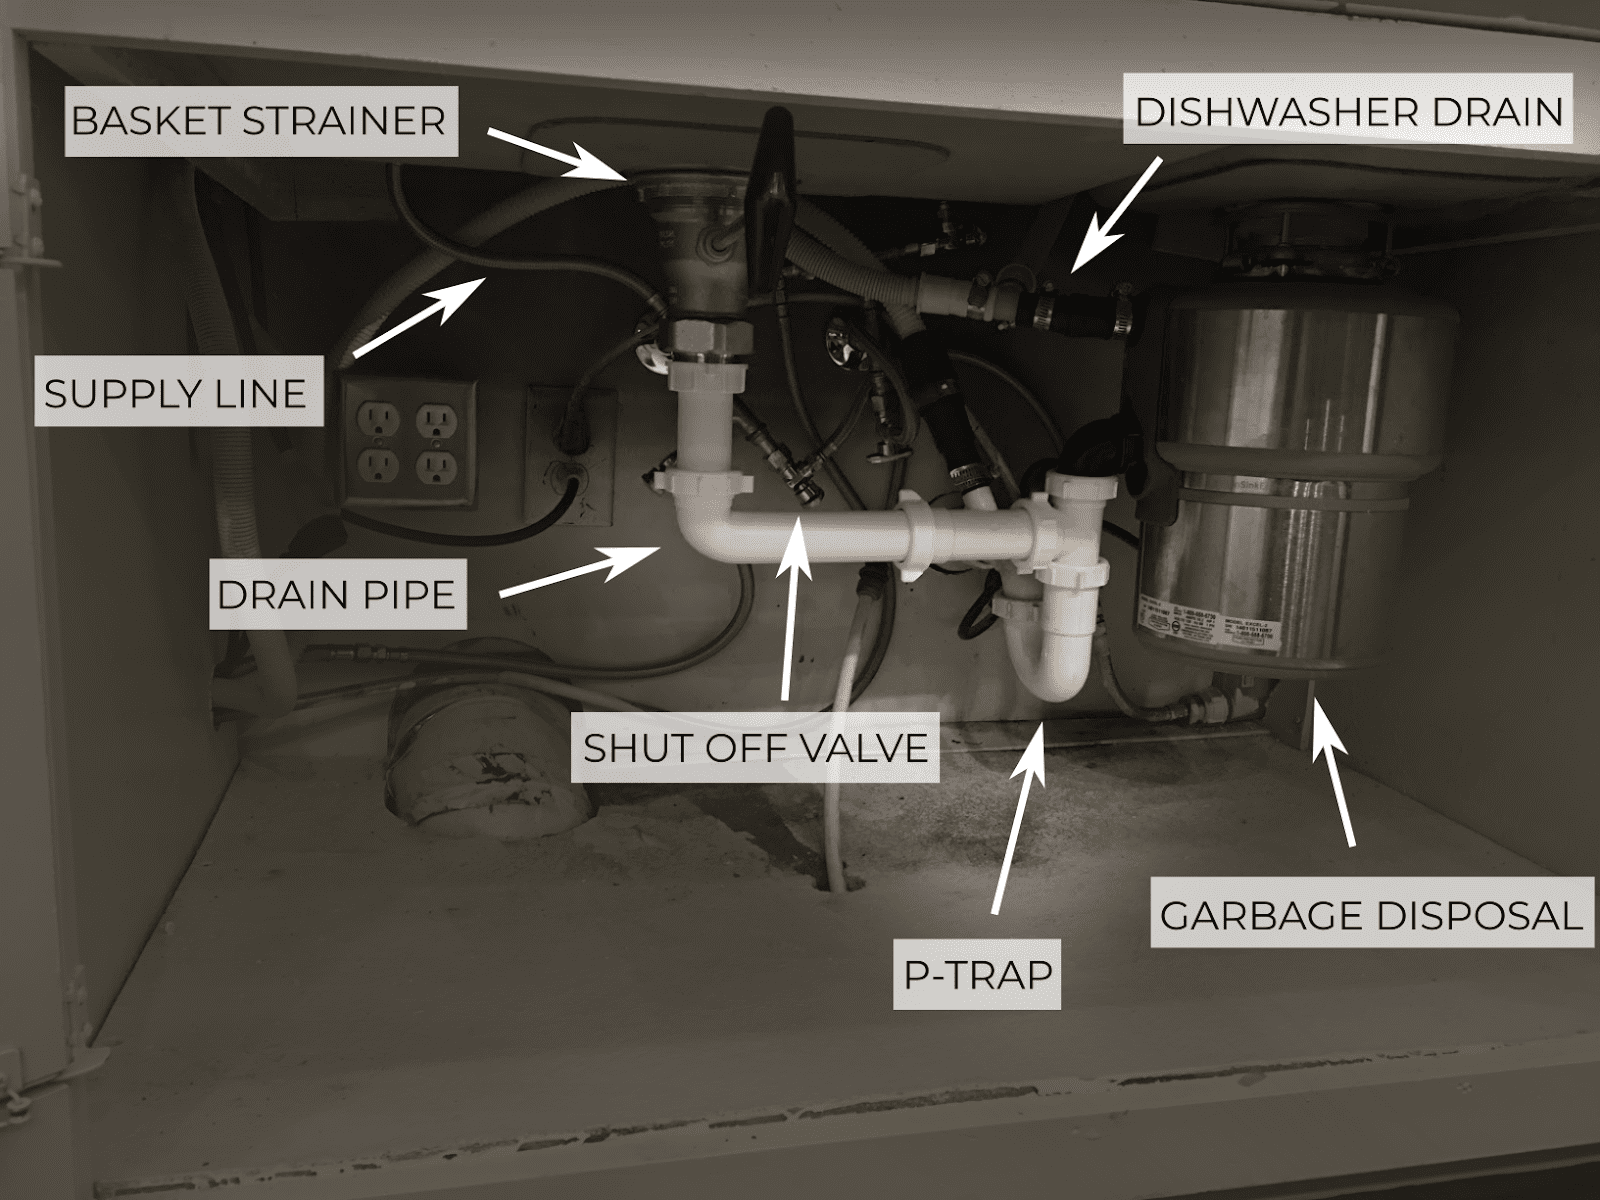
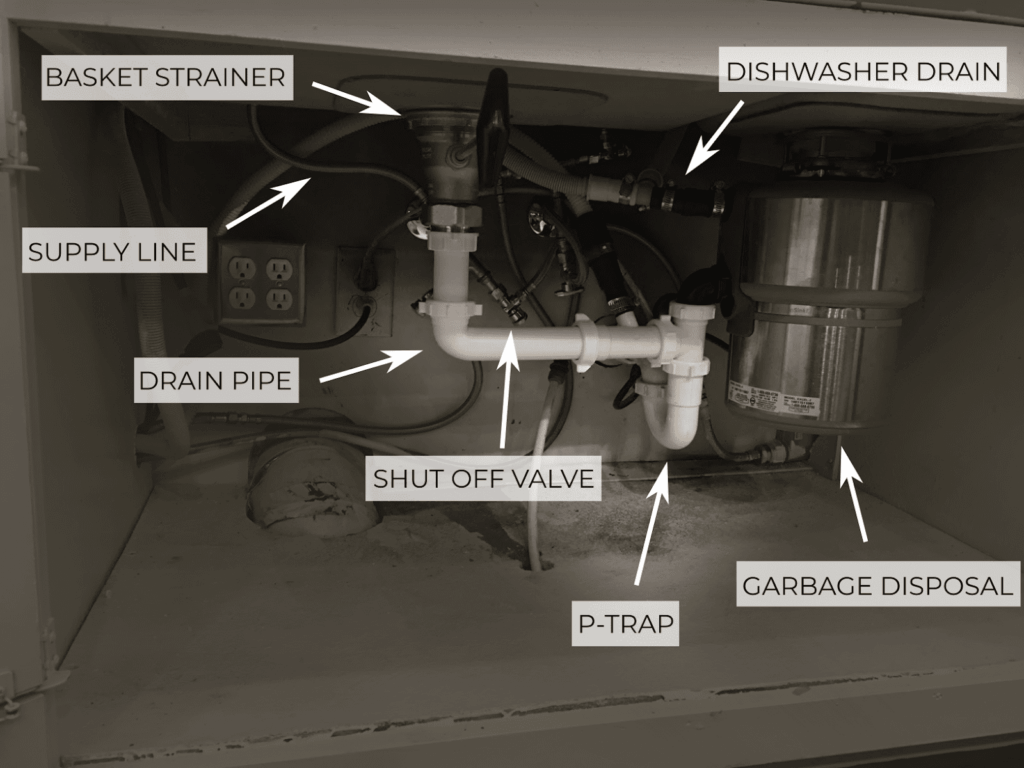
The Anatomy of a Sink
Before diving into repairs, it’s helpful to familiarize yourself with the different parts of a typical sink:
* **Faucet:** The fixture that controls the flow of water. Leaks can occur around the base, handle, or spout.
* **Supply Lines:** Flexible tubes that connect the faucet to the water supply valves. Leaks often occur at the connections.
* **Drain:** The opening at the bottom of the sink that allows water to flow into the drainpipe. Leaks can occur around the drain flange or the stopper mechanism.
* **P-Trap:** The curved pipe under the sink that traps debris and prevents sewer gases from entering your home. Leaks are common at the P-trap connections.
* **Tailpiece:** The pipe that connects the sink drain to the P-trap.
* **Garbage Disposal (if applicable):** A device that grinds food waste. Leaks can occur around the disposal’s connections or the unit itself.
Common Causes of Sink Leaks
Several factors can contribute to a leaking sink. Here are some of the most common culprits:
* **Worn-out Washers and O-Rings:** These small rubber or plastic parts create a watertight seal in faucets and other connections. Over time, they can become brittle, cracked, or worn out, leading to leaks.
* **Loose Connections:** Vibrations and normal use can cause connections to loosen over time, creating gaps that allow water to escape. This is frequently seen with supply lines and drain connections.
* **Corroded Pipes:** Corrosion can weaken pipes and fittings, leading to pinhole leaks or complete failure. This is more common in older homes with galvanized steel pipes.
* **Damaged Faucet Cartridge:** The faucet cartridge controls the flow and temperature of water. A damaged cartridge can cause leaks around the faucet handle.
* **Clogged Drain:** A clogged drain can cause water to back up and leak around the drain flange or overflow opening.
* **Faulty Faucet Body:** In rare cases, the faucet body itself can crack or develop leaks due to manufacturing defects or damage.
Why Fixing a Leaking Sink Matters
Addressing a leaking sink promptly is crucial for several reasons:
* **Water Conservation:** Even a small drip can waste significant amounts of water over time, leading to higher water bills and environmental impact.
* **Preventing Water Damage:** Leaking water can damage cabinets, flooring, and walls, leading to costly repairs and potential mold growth.
* **Avoiding Mold Growth:** Mold thrives in damp environments, and a leaking sink provides the perfect breeding ground. Mold can cause health problems and require professional remediation.
* **Maintaining Home Value:** Water damage and mold can negatively impact your home’s value. Addressing leaks promptly helps maintain your property’s condition.
Essential Tools and Materials for Fixing a Leaking Sink
Before you start any repairs, gather the necessary tools and materials. Having everything on hand will make the job easier and more efficient.
* **Basin Wrench:** Used to loosen and tighten nuts in tight spaces, such as under the sink.
* **Adjustable Wrench:** For loosening and tightening various nuts and bolts.
* **Pliers:** For gripping and manipulating small parts.
* **Screwdrivers (Phillips and Flathead):** For removing and installing screws.
* **Plumber’s Tape (Teflon Tape):** Used to seal threaded connections.
* **Plumber’s Putty:** Used to seal drain flanges and other fittings.
* **Bucket:** To catch dripping water.
* **Towels or Rags:** To clean up spills and dry surfaces.
* **Flashlight or Headlamp:** To provide better visibility under the sink.
* **Replacement Parts:** Washers, O-rings, cartridges, supply lines, or drain components as needed.
* **Safety Glasses:** To protect your eyes from debris.
* **Gloves:** To protect your hands from dirt and chemicals.
Step-by-Step Guide: How to Fix a Leaking Sink
Now that you have the necessary tools and materials, let’s walk through the process of fixing a leaking sink.
Step 1: Identify the Source of the Leak
The first step is to pinpoint the exact location of the leak. This may require some careful observation and detective work. Here’s how:
1. **Dry the Area:** Use towels or rags to thoroughly dry the area under the sink, including the pipes, connections, and surrounding surfaces.
2. **Observe Carefully:** Turn on the faucet and watch closely for any signs of water leaking. Pay attention to the faucet base, handles, supply lines, drain, P-trap, and garbage disposal (if applicable).
3. **Use a Flashlight:** A flashlight or headlamp can help you see into tight spaces and identify small leaks.
4. **Feel for Moisture:** Run your fingers along the pipes and connections to feel for any dampness. This can help you locate leaks that are difficult to see.
Step 2: Turn Off the Water Supply
Before you start any repairs, it’s essential to turn off the water supply to the sink. This will prevent water from gushing out when you disconnect pipes or fittings.
1. **Locate the Shut-Off Valves:** Look for shut-off valves under the sink, typically located on the supply lines leading to the faucet.
2. **Turn Off the Valves:** Turn both the hot and cold water valves clockwise until they are completely closed. If the valves are stiff or difficult to turn, don’t force them. Try using a wrench to gently loosen them.
3. **Test the Valves:** Turn on the faucet briefly to make sure the water is completely shut off. If water continues to flow, you may need to shut off the main water supply to your home.
Step 3: Repairing Common Sink Leaks
Once you’ve identified the source of the leak and turned off the water supply, you can begin making the necessary repairs. Here are some common sink leak scenarios and how to fix them:
Leaking Faucet Base
* **Cause:** Worn-out O-rings or seals under the faucet base.
* **Solution:**
1. Turn off the water supply.
2. Remove the faucet handle and any decorative trim.
3. Loosen the nut that secures the faucet to the sink.
4. Lift the faucet up and remove the old O-rings or seals.
5. Install new O-rings or seals, making sure they are properly seated.
6. Reassemble the faucet and tighten the nut.
7. Turn on the water supply and check for leaks.
Leaking Faucet Handle
* **Cause:** Worn-out cartridge or stem O-rings.
* **Solution:**
1. Turn off the water supply.
2. Remove the faucet handle screw and the handle.
3. Remove the retaining clip or nut that holds the cartridge in place.
4. Pull out the old cartridge and replace it with a new one.
5. Reassemble the faucet and tighten the handle screw.
6. Turn on the water supply and check for leaks.
Leaking Supply Line Connections
* **Cause:** Loose connections or worn-out compression rings.
* **Solution:**
1. Turn off the water supply.
2. Use a wrench to tighten the connections at both ends of the supply line.
3. If the leak persists, disconnect the supply line and inspect the compression rings.
4. Replace the compression rings if they are damaged or worn out.
5. Reattach the supply line and tighten the connections.
6. Turn on the water supply and check for leaks.
Leaking Drain Connections
* **Cause:** Loose connections or worn-out washers.
* **Solution:**
1. Place a bucket under the drain to catch any water.
2. Loosen the slip nuts that connect the drain pipes.
3. Inspect the washers for damage or wear.
4. Replace the washers if necessary.
5. Reassemble the drain pipes and tighten the slip nuts.
6. Run water into the sink and check for leaks.
Leaking P-Trap
* **Cause:** Loose connections, cracks, or corrosion.
* **Solution:**
1. Place a bucket under the P-trap to catch any water.
2. Loosen the slip nuts that connect the P-trap to the drain pipes.
3. Inspect the P-trap for cracks or corrosion.
4. If the P-trap is damaged, replace it with a new one.
5. Reassemble the drain pipes and tighten the slip nuts.
6. Run water into the sink and check for leaks.
Leaking Garbage Disposal
* **Cause:** Loose connections, worn-out seals, or internal damage.
* **Solution:**
1. Turn off the power to the garbage disposal.
2. Check the connections between the disposal and the sink drain and dishwasher (if applicable).
3. Tighten any loose connections.
4. If the leak persists, inspect the disposal’s mounting assembly and seals.
5. If the disposal is internally damaged, it may need to be replaced.
Step 4: Testing the Repair
After making the necessary repairs, it’s essential to test your work to ensure the leak is completely fixed.
1. **Turn on the Water Supply:** Slowly turn on the hot and cold water supply valves.
2. **Run the Faucet:** Turn on the faucet and let the water run for a few minutes.
3. **Check for Leaks:** Carefully inspect all the connections and repaired areas for any signs of water leaking.
4. **Dry the Area:** Use towels or rags to dry the area under the sink.
5. **Monitor for Leaks:** Check the area again after a few hours to make sure there are no new leaks.
When to Call a Plumber
While many sink leaks can be fixed with DIY methods, some situations require the expertise of a professional plumber.
* **You Can’t Identify the Source of the Leak:** If you’ve tried to locate the leak but can’t pinpoint the source, a plumber can use specialized tools and techniques to find it.
* **You’re Not Comfortable Making the Repairs:** If you’re not confident in your DIY skills, it’s best to call a plumber to avoid making the problem worse.
* **The Leak is Severe:** If the leak is causing significant water damage or is beyond your ability to repair, a plumber can provide immediate assistance.
* **You Have Old or Corroded Pipes:** If your pipes are old or corroded, a plumber can assess the situation and recommend the best course of action, which may involve replacing the pipes.
* **You’re Dealing with a Complex Plumbing System:** If you have a complex plumbing system or are unsure how to proceed, a plumber can provide expert guidance and ensure the repairs are done correctly.
Maintaining Your Sink to Prevent Leaks
Preventing leaks is always better than fixing them. Here are some tips for maintaining your sink and preventing leaks:
* **Regularly Inspect Your Sink:** Check under your sink periodically for any signs of leaks or moisture.
* **Tighten Loose Connections:** Use a wrench to tighten any loose connections on the supply lines, drain pipes, and faucet.
* **Replace Worn-Out Washers and O-Rings:** Replace any worn-out washers or O-rings as soon as you notice them.
* **Avoid Clogging Your Drain:** Prevent clogs by avoiding pouring grease, food scraps, or other debris down the drain.
* **Flush Your Drain Regularly:** Flush your drain with hot water and baking soda to help prevent clogs and buildup.
* **Consider a Drain Strainer:** Use a drain strainer to catch hair and other debris before they enter the drainpipe.
Alternative Solutions and Products
While DIY repairs are often effective, various products and services can aid in fixing or preventing sink leaks. One such product is Leak Detection Spray. This spray, available at most hardware stores, can help pinpoint the exact location of a leak by creating bubbles where water is escaping. Similarly, pipe joint compounds, like pipe dope, can provide a more secure seal for threaded connections. For those less inclined to DIY, professional plumbing services offer comprehensive leak detection and repair, often utilizing advanced technologies like thermal imaging to identify hidden leaks. Always consider the severity of the leak and your comfort level before deciding on a solution.
Frequently Asked Questions (Q&A)
**Q1: How do I know if my sink leak is a serious problem?**
*A1: Any leak, no matter how small, should be addressed promptly. Even a slow drip can waste water and cause damage over time. Signs of a serious problem include significant water damage, mold growth, or a leak that you can’t identify or repair yourself.*
**Q2: Can I use Teflon tape on plastic drain pipes?**
*A2: While Teflon tape is commonly used on metal pipe threads, it’s generally not recommended for plastic drain pipes. Plastic drain pipes typically use slip nuts and washers to create a watertight seal. Over-tightening plastic connections with Teflon tape can actually damage the plastic.*
**Q3: What’s the best way to remove a stubborn faucet handle?**
*A3: If a faucet handle is stuck, try using a penetrating oil lubricant. Apply the lubricant around the base of the handle and let it sit for a few minutes. Then, gently try to wiggle the handle loose. If that doesn’t work, you may need to use a faucet handle puller tool.*
**Q4: How often should I replace my sink supply lines?**
*A4: It’s generally recommended to replace your sink supply lines every 5-10 years, or sooner if you notice any signs of wear or damage. Flexible stainless steel braided supply lines are a durable and reliable option.*
**Q5: What is the purpose of the P-trap under my sink?**
*A5: The P-trap is a U-shaped pipe that traps a small amount of water. This water acts as a barrier, preventing sewer gases from entering your home through the drain.*
**Q6: Can I use a chemical drain cleaner to fix a clogged drain that’s causing a leak?**
*A6: While chemical drain cleaners can sometimes clear clogs, they can also damage your pipes and cause leaks. It’s generally best to try other methods first, such as using a plunger or a drain snake. If those methods don’t work, consider calling a plumber to clear the clog.*
**Q7: How do I prevent hard water from causing leaks in my sink?**
*A7: Hard water can cause mineral buildup that leads to corrosion and leaks. Consider installing a water softener to reduce the mineral content of your water. Regularly cleaning your faucet and fixtures can also help prevent buildup.*
**Q8: What type of plumber’s putty should I use for my sink drain?**
*A8: Use a non-hardening plumber’s putty for sink drains. This type of putty remains pliable and creates a watertight seal without drying out or cracking.*
**Q9: Is it safe to use vinegar and baking soda to clean my sink drain?**
*A9: Yes, vinegar and baking soda can be a safe and effective way to clean your sink drain. Pour baking soda down the drain, followed by vinegar. Let it fizz for about 30 minutes, then flush with hot water.*
**Q10: What should I do if I accidentally over-tighten a plastic drain connection?**
*A10: If you over-tighten a plastic drain connection, you risk cracking or stripping the threads. If you suspect you’ve over-tightened a connection, carefully loosen it and inspect for damage. If the threads are damaged, you may need to replace the fitting.*
Conclusion
Fixing a leaking sink doesn’t have to be a daunting task. By following this comprehensive guide, you can confidently diagnose the source of the leak and make the necessary repairs. Remember to prioritize safety, take your time, and don’t hesitate to call a plumber if you’re unsure about any step. By tackling this common plumbing problem yourself, you can save money, conserve water, and protect your home from water damage. We hope this guide has empowered you with the knowledge and skills to conquer that pesky leak. Now, grab your tools and get ready to say goodbye to that annoying drip!
Have you successfully fixed a leaky sink using these tips? Share your experiences and any additional advice in the comments below! Or, if you’re facing a more complex plumbing issue, contact our experts for a consultation on how to fix your leaking sink and prevent future problems.
