Kitchen Handle Single Faucet Loose at Base: A Comprehensive Guide to Fixing and Preventing the Problem
Is your kitchen handle single faucet loose at base, wobbling precariously every time you reach for it? This common issue can be frustrating, leading to water leaks, damage to your countertop, and even complete faucet failure if left unaddressed. This comprehensive guide will walk you through the common causes of a loose faucet handle, step-by-step repair solutions, and preventative measures to ensure a stable and long-lasting fixture. We’ll provide expert insights and practical tips to help you tackle this problem with confidence, even if you’re not a plumbing pro. By the end of this article, you’ll understand not only how to fix a kitchen handle single faucet loose at base, but also how to maintain your faucet for years to come. Our goal is to empower you with the knowledge and skills to keep your kitchen running smoothly.
Understanding Why Your Kitchen Faucet Handle is Loose at the Base
A loose kitchen faucet handle at the base is rarely a mystery. Several factors contribute to this common household problem. Understanding these causes is the first step towards a lasting solution.
- Worn-Out O-Rings: O-rings are small, rubber gaskets that create a watertight seal around the faucet handle stem. Over time, these rings can dry out, crack, or become compressed, leading to a loose handle.
- Loose Mounting Nuts: The faucet body is secured to the countertop by mounting nuts underneath the sink. If these nuts loosen, the entire faucet, including the handle, will become wobbly.
- Corrosion: Corrosion, especially in areas with hard water, can weaken the faucet components and cause the handle to loosen.
- Stripped Screws: The screws that hold the handle to the faucet stem can become stripped over time, rendering them unable to hold the handle securely.
- Water Pressure Fluctuations: Sudden changes in water pressure can stress the faucet components, contributing to loosening.
- Improper Installation: A faucet that wasn’t properly installed from the beginning is more prone to developing a loose handle.
- General Wear and Tear: Over years of use, the constant turning and pressure on the handle can simply wear down the connecting parts.
Understanding these root causes allows for a more targeted and effective repair.
Tools and Materials You’ll Need to Fix a Loose Kitchen Faucet Handle
Before you start any repair, gather the necessary tools and materials. Having everything on hand will make the process smoother and more efficient.
- Adjustable Wrench: For tightening mounting nuts and other fittings.
- Screwdrivers (Phillips and Flathead): To remove and tighten screws.
- Allen Wrench Set: Some faucets use Allen screws to secure the handle.
- Penetrating Oil (e.g., WD-40): To loosen corroded or stuck parts.
- New O-Rings: If the existing O-rings are worn, replace them with new ones of the correct size.
- Plumber’s Grease: To lubricate O-rings and other moving parts.
- Basin Wrench: For reaching hard-to-access mounting nuts under the sink.
- Clean Rags or Sponges: For cleaning and wiping up spills.
- Flashlight or Headlamp: To see clearly under the sink.
- Safety Glasses: To protect your eyes from debris.
- Gloves: To protect your hands.
- Replacement Screws (if needed): If the existing screws are stripped.
Having these tools and materials ready will set you up for success.
Step-by-Step Guide to Fixing a Loose Kitchen Faucet Handle
Now, let’s get to the actual repair. Follow these steps carefully to fix your loose kitchen faucet handle.
Step 1: Turn Off the Water Supply
Before you do anything, turn off the water supply to the faucet. This will prevent flooding and make the repair process much cleaner. Locate the shut-off valves under the sink (usually one for hot water and one for cold water) and turn them clockwise until they are completely closed. If you don’t have shut-off valves, you’ll need to turn off the main water supply to your house.
Step 2: Identify the Faucet Type
Different faucets have different handle attachment mechanisms. Common types include:
- Set Screw Handles: These handles are secured with a small set screw, usually located on the side or back of the handle.
- Screw-On Handles: These handles screw directly onto the faucet stem.
- Cap-and-Screw Handles: These handles have a decorative cap that covers a screw.
Identifying the type of handle will help you determine how to remove it.
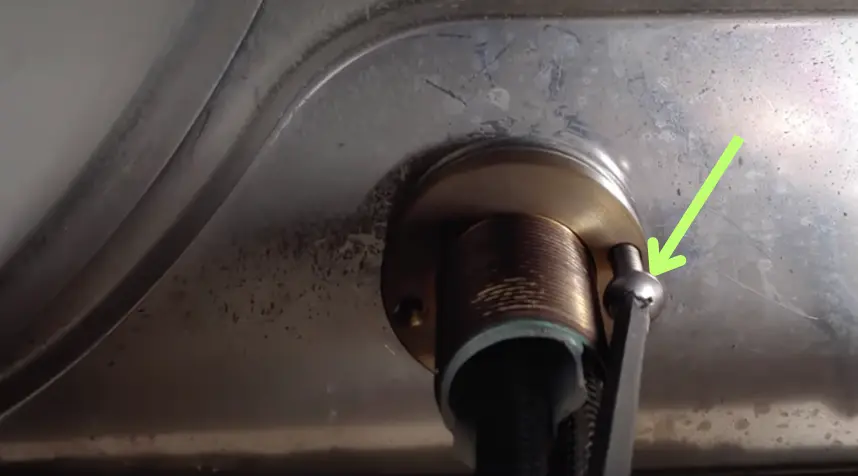
Step 3: Remove the Faucet Handle
Depending on the type of handle, follow these instructions:
- Set Screw Handles: Use an Allen wrench to loosen the set screw. Once the screw is loose, you should be able to pull the handle straight off.
- Screw-On Handles: Simply unscrew the handle counterclockwise.
- Cap-and-Screw Handles: Use a small screwdriver or knife to pry off the decorative cap. Underneath, you’ll find a screw. Unscrew it, and then pull the handle off.
If the handle is stuck, try applying some penetrating oil and letting it sit for a few minutes before attempting to remove it again.
Step 4: Inspect the O-Rings and Stem
Once the handle is removed, inspect the O-rings on the faucet stem. Look for signs of wear, such as cracks, dryness, or compression. If the O-rings are damaged, replace them with new ones of the correct size. Also, check the faucet stem for any signs of damage or corrosion.
Step 5: Replace Worn O-Rings
To replace the O-rings, simply roll the old ones off the stem and roll the new ones on. Apply a small amount of plumber’s grease to the new O-rings to lubricate them and ensure a good seal.
Step 6: Tighten Mounting Nuts (Under the Sink)
If the faucet itself is loose at the base, the mounting nuts under the sink may be loose. Use an adjustable wrench or basin wrench to tighten these nuts. Be careful not to overtighten them, as this could damage the countertop or the faucet.
Step 7: Reassemble the Faucet Handle
After replacing the O-rings and tightening the mounting nuts, reassemble the faucet handle. Follow the reverse steps of disassembly.
- Set Screw Handles: Slide the handle onto the stem and tighten the set screw.
- Screw-On Handles: Screw the handle back onto the stem.
- Cap-and-Screw Handles: Screw the handle back on, and then replace the decorative cap.
Step 8: Test the Faucet
Turn the water supply back on and test the faucet. Check for leaks around the handle and the base of the faucet. If you see any leaks, tighten the connections further.
Preventative Measures to Keep Your Kitchen Faucet Handle Secure
Prevention is always better than cure. Here are some preventative measures to keep your kitchen faucet handle secure and prevent future problems:
- Regularly Inspect Your Faucet: Check your faucet periodically for any signs of looseness or leaks.
- Lubricate Moving Parts: Apply plumber’s grease to the O-rings and other moving parts at least once a year.
- Avoid Overtightening: When tightening screws or nuts, avoid overtightening them, as this can damage the components.
- Use a Water Softener: If you have hard water, consider using a water softener to reduce corrosion.
- Proper Installation: Ensure that your faucet is properly installed from the beginning. If you’re not comfortable installing it yourself, hire a professional plumber.
- Gentle Use: Avoid applying excessive force to the faucet handle.
- Replace Worn Parts Promptly: If you notice any worn or damaged parts, replace them immediately to prevent further damage.
These simple measures can significantly extend the life of your faucet and prevent the handle from becoming loose.
Choosing the Right Replacement Faucet Handle (If Needed)
Sometimes, the damage to the faucet handle or stem is beyond repair. In this case, you may need to replace the entire handle or even the entire faucet. If you’re replacing the handle, make sure to choose one that is compatible with your faucet model.
Here are some factors to consider when choosing a replacement faucet handle:
- Compatibility: Ensure that the handle is compatible with your faucet model. Check the manufacturer’s website or consult with a plumbing professional.
- Material: Choose a handle made from durable materials, such as metal or high-quality plastic.
- Style: Select a handle that matches the style of your kitchen décor.
- Ergonomics: Choose a handle that is comfortable to grip and easy to use.
- Finish: Select a finish that matches your faucet and other kitchen fixtures.
Choosing the right replacement handle will ensure a long-lasting and aesthetically pleasing repair.
When to Call a Professional Plumber
While many faucet repairs can be done DIY, there are times when it’s best to call a professional plumber. Consider calling a plumber if:
- You’re not comfortable working with plumbing.
- You’ve tried to fix the problem yourself, but it’s not working.
- The faucet is severely damaged or corroded.
- You suspect a more serious plumbing problem, such as a leak in the wall.
- You’re dealing with a complicated faucet system.
A professional plumber has the expertise and tools to diagnose and fix complex plumbing problems safely and effectively.
The Importance of Proper Faucet Maintenance
Proper faucet maintenance is essential for preventing problems and extending the life of your faucet. Regular maintenance can save you money on repairs and replacements in the long run. It also helps to ensure that your faucet is functioning properly and efficiently.
Here are some key aspects of proper faucet maintenance:
- Regular Cleaning: Clean your faucet regularly to remove mineral buildup and prevent corrosion.
- Leak Detection and Repair: Check your faucet for leaks regularly and repair them promptly.
- Lubrication: Lubricate moving parts to keep them functioning smoothly.
- Inspection: Inspect your faucet for any signs of wear or damage.
- Prompt Repairs: Address any problems promptly to prevent them from escalating.
By following these maintenance tips, you can keep your faucet in good condition for years to come.
Advanced Troubleshooting for Stubborn Faucet Handle Issues
Sometimes, a loose faucet handle can be a symptom of a more complex problem. Here are some advanced troubleshooting tips for stubborn faucet handle issues:
- Check the Cartridge: The cartridge is the internal component that controls the flow of water. If the cartridge is damaged or worn, it can cause the handle to loosen.
- Inspect the Valve Seat: The valve seat is the part of the faucet that the cartridge presses against to stop the flow of water. If the valve seat is corroded or damaged, it can cause leaks and a loose handle.
- Look for Hidden Leaks: Sometimes, a loose handle is caused by a hidden leak in the faucet body or the connecting pipes.
- Consider Mineral Buildup: In areas with hard water, mineral buildup can accumulate inside the faucet and cause various problems, including a loose handle.
If you suspect any of these issues, it’s best to consult with a professional plumber.
The Role of Water Quality in Faucet Longevity
The quality of your water can significantly impact the longevity of your faucet. Hard water, which contains high levels of minerals like calcium and magnesium, can cause mineral buildup and corrosion. This can lead to various faucet problems, including a loose handle.
If you have hard water, consider using a water softener to reduce mineral buildup and protect your faucet. You can also use a faucet filter to remove impurities from the water.
Kitchen Faucet Handle Single Faucet Loose at Base: A Case Study
Let’s consider a real-world example. A homeowner noticed their kitchen handle single faucet loose at base. Upon inspection, they found that the O-rings were worn and the mounting nuts were loose. After replacing the O-rings and tightening the mounting nuts, the handle was secure and the faucet was functioning properly.
This case study illustrates the importance of identifying the root cause of the problem and taking appropriate action.
The Future of Faucet Design and Maintenance
Faucet technology is constantly evolving. New faucets are being designed with improved durability, water efficiency, and ease of maintenance. Some modern faucets even feature touchless operation and smart technology.
As faucet technology advances, it’s important to stay informed about the latest maintenance techniques and best practices.
Q&A: Expert Answers to Your Faucet Handle Questions
Here are some frequently asked questions about loose kitchen faucet handles:
- Q: How often should I replace the O-rings on my faucet?
A: It’s generally recommended to replace the O-rings every 1-2 years, or whenever you notice signs of wear or leaks.
- Q: Can I use any type of grease on my faucet O-rings?
A: No, you should only use plumber’s grease, which is specifically designed for plumbing applications. Other types of grease can damage the O-rings.
- Q: How do I know if my faucet has a cartridge or a valve seat?
A: Most modern faucets use cartridges. Valve seats are more common in older faucets.
- Q: Is it possible to overtighten the mounting nuts under the sink?
A: Yes, overtightening the mounting nuts can damage the countertop or the faucet. Tighten them just enough to secure the faucet.
- Q: What should I do if I can’t remove the faucet handle?
A: Try applying some penetrating oil and letting it sit for a few minutes before attempting to remove the handle again. If it’s still stuck, consult with a professional plumber.
- Q: How do I prevent mineral buildup on my faucet?
A: Use a water softener or a faucet filter to reduce mineral buildup. You can also clean your faucet regularly with a mild vinegar solution.
- Q: Can a loose faucet handle cause water damage?
A: Yes, a loose faucet handle can lead to leaks, which can cause water damage to your countertop, cabinets, and flooring.
- Q: What are the signs of a worn faucet cartridge?
A: Signs of a worn faucet cartridge include leaks, dripping, and difficulty controlling the water temperature.
- Q: Is it better to repair or replace a faucet?
A: It depends on the extent of the damage. If the faucet is relatively new and the damage is minor, it’s usually more cost-effective to repair it. However, if the faucet is old or severely damaged, it’s often better to replace it.
- Q: How can I find a compatible replacement faucet handle?
A: Check the manufacturer’s website or consult with a plumbing professional to find a compatible replacement faucet handle.
Conclusion
A kitchen handle single faucet loose at base is a common problem that can be easily fixed with the right tools and knowledge. By understanding the causes of a loose handle, following the step-by-step repair guide, and taking preventative measures, you can keep your faucet secure and functioning properly for years to come. Remember, regular maintenance is key to preventing problems and extending the life of your faucet. If you’re not comfortable performing the repairs yourself, don’t hesitate to call a professional plumber.
Now that you’re armed with this knowledge, share your experiences with kitchen handle single faucet loose at base in the comments below. Or, explore our advanced guide to faucet maintenance for even more expert tips and tricks! If you have a more complex situation, contact our experts for a consultation on kitchen handle single faucet loose at base solutions.
