Leaky Sink SOS: Expert Guide to Stop Leaks & Save Money
A leaky sink isn’t just annoying; it’s a silent money drain, a potential source of water damage, and a constant reminder of a problem needing fixing. If you’re dealing with a persistent drip, a gurgling drain, or unexplained moisture under your sink, you’ve come to the right place. This comprehensive guide provides expert advice, troubleshooting tips, and step-by-step solutions to conquer your leaky sink woes. We’ll not only help you identify the source of the leak but also equip you with the knowledge to fix it yourself or confidently hire a professional. This isn’t just another article; it’s your trusted resource, built on years of plumbing experience and designed to save you time, money, and frustration.
Understanding the Anatomy of a Leaky Sink
Before diving into solutions, let’s understand the potential culprits behind a leaky sink. A sink isn’t just a bowl; it’s a complex system of pipes, connections, and seals, any of which can fail over time. Understanding these components is the first step to diagnosing and fixing the problem.
Common Sink Components and Their Role
* **Faucet:** The faucet controls the flow of water and includes handles, a spout, and internal cartridges or valves. Leaks often originate within the faucet itself.
* **Supply Lines:** These flexible tubes connect the faucet to the hot and cold water supply lines. They are prone to leaks at the connections or along the tube’s length.
* **Drain Assembly:** This includes the sink strainer, drainpipe, P-trap, and tailpiece. Each component is connected, and leaks can occur at any joint.
* **P-Trap:** The curved pipe under the sink that traps water, preventing sewer gases from entering your home. It can leak if cracked or if connections are loose.
* **Sink Basin:** The actual bowl of the sink. Cracks or damage to the sink basin itself can also cause leaks, though this is less common.
Where Do Leaky Sinks Typically Occur?
Most **leaky sink** issues arise from worn-out washers, loose connections, or corroded pipes. Here’s a breakdown of the most common leak locations:
* **Faucet Base:** Leaks around the base of the faucet often indicate a worn-out O-ring or sealant.
* **Faucet Handles:** Drips from the faucet handles usually point to worn-out cartridges or valve seats.
* **Supply Line Connections:** Leaks at the point where the supply lines connect to the faucet or shut-off valves are often due to loose connections or damaged compression rings.
* **Drain Connections:** Leaks around the drain strainer, tailpiece, or P-trap are typically caused by loose connections or worn-out washers.
* **P-Trap:** Cracks in the P-trap itself, or loose connections, are common sources of leaks.
Diagnosing Your Leaky Sink: A Step-by-Step Approach
Finding the source of a leaky sink can seem daunting, but with a systematic approach, you can pinpoint the problem and avoid unnecessary repairs. Here’s a step-by-step diagnostic process:
1. **Dry Everything:** Start by thoroughly drying the area under the sink with paper towels. This will make it easier to spot the source of the leak.
2. **Inspect the Faucet:** Run the faucet and observe carefully for leaks around the base, handles, and spout. Check for drips even when the faucet is turned off.
3. **Check the Supply Lines:** Feel along the supply lines for any moisture. Pay close attention to the connections at both ends.
4. **Examine the Drain Assembly:** Run water down the drain and inspect the drain strainer, tailpiece, P-trap, and all connections for leaks.
5. **Tighten Connections:** If you find a leak at a connection, try tightening the nut with a wrench. Be careful not to overtighten, as this can damage the fitting.
6. **Use Food Coloring:** If the leak is difficult to pinpoint, add a few drops of food coloring to the sink water. This can help you trace the path of the leak.
Essential Tools and Materials for Fixing a Leaky Sink
Before you start any repairs, gather the necessary tools and materials. Having everything on hand will make the job easier and prevent frustrating interruptions. Here’s a basic list:
* **Basin Wrench:** For loosening and tightening nuts in tight spaces.
* **Adjustable Wrench:** For general tightening and loosening of nuts and bolts.
* **Pliers:** For gripping and holding parts.
* **Screwdrivers (Phillips and Flathead):** For removing faucet handles and other components.
* **Plumber’s Putty:** For sealing around the drain strainer.
* **Teflon Tape:** For sealing threaded connections.
* **Replacement Washers and O-rings:** Have a variety of sizes on hand, as these are common culprits.
* **Bucket:** To catch water during repairs.
* **Towels:** For cleaning up spills.
* **Safety Glasses:** To protect your eyes.
* **Gloves:** To protect your hands.
How to Fix Common Leaky Sink Problems: DIY Solutions
Many **leaky sink** problems can be resolved with simple DIY repairs. Here are some common issues and how to fix them:
Fixing a Leaky Faucet Handle
* **Problem:** Drips from the faucet handle.
* **Cause:** Worn-out cartridge or valve seat.
* **Solution:**
1. Turn off the water supply to the faucet.
2. Remove the faucet handle (usually held in place by a screw).
3. Remove the old cartridge or valve seat.
4. Install a new cartridge or valve seat.
5. Reassemble the faucet handle.
Repairing a Leaky Faucet Base
* **Problem:** Leaks around the base of the faucet.
* **Cause:** Worn-out O-ring or sealant.
* **Solution:**
1. Turn off the water supply to the faucet.
2. Remove the faucet from the sink.
3. Remove the old O-ring or sealant.
4. Install a new O-ring or apply fresh plumber’s putty.
5. Reinstall the faucet.
Tightening Loose Supply Line Connections
* **Problem:** Leaks at the supply line connections.
* **Cause:** Loose connections or damaged compression rings.
* **Solution:**
1. Turn off the water supply to the faucet.
2. Tighten the connection with a wrench. Be careful not to overtighten.
3. If the leak persists, replace the compression ring.
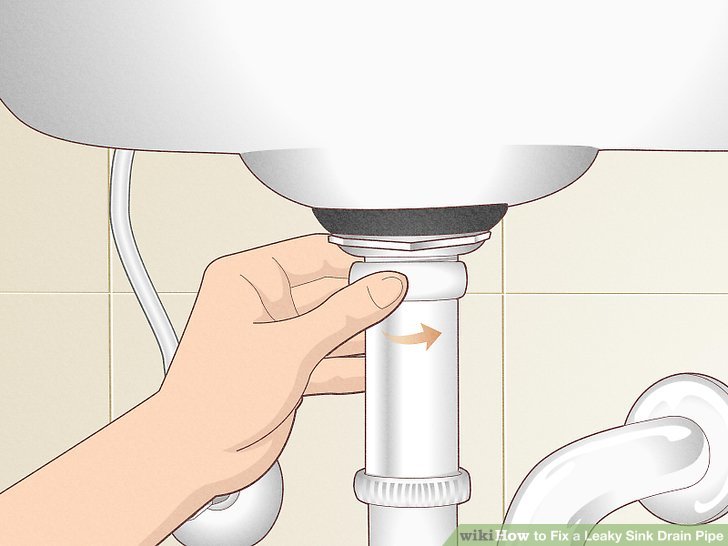
Sealing a Leaky Drain Connection
* **Problem:** Leaks around the drain strainer, tailpiece, or P-trap.
* **Cause:** Loose connections or worn-out washers.
* **Solution:**
1. Loosen the connection with a wrench.
2. Inspect the washer for damage and replace if necessary.
3. Apply Teflon tape to the threads of the connection.
4. Tighten the connection.
Replacing a Damaged P-Trap
* **Problem:** Cracks in the P-trap itself.
* **Cause:** Physical damage or corrosion.
* **Solution:**
1. Place a bucket under the P-trap to catch water.
2. Loosen the connections on both ends of the P-trap.
3. Remove the old P-trap.
4. Install a new P-trap.
5. Tighten the connections.
When to Call a Plumber: Recognizing Your Limits
While many **leaky sink** repairs are within the reach of a DIY enthusiast, some situations require the expertise of a licensed plumber. Here are some signs that it’s time to call in the professionals:
* **Persistent Leaks:** If you’ve tried multiple DIY solutions and the leak persists, there may be a more complex underlying problem.
* **Hidden Leaks:** If you suspect a leak behind a wall or under the floor, it’s best to call a plumber to avoid further damage.
* **Extensive Corrosion:** If the pipes are heavily corroded, they may need to be replaced, which is a job for a plumber.
* **Lack of Confidence:** If you’re uncomfortable working with plumbing, it’s always best to err on the side of caution and hire a professional.
Choosing the Right Plumber: Ensuring Quality and Reliability
If you decide to hire a plumber, it’s important to choose wisely. Here are some tips for finding a qualified and reliable plumber:
* **Get Recommendations:** Ask friends, family, or neighbors for recommendations.
* **Check Online Reviews:** Read online reviews on sites like Yelp and Google to get an idea of the plumber’s reputation.
* **Verify Licensing and Insurance:** Make sure the plumber is licensed and insured in your state.
* **Get Multiple Quotes:** Get quotes from several plumbers before making a decision.
* **Ask About Guarantees:** Ask about the plumber’s warranty or guarantee on their work.
Preventing Leaky Sinks: Proactive Measures for Long-Term Protection
Preventing **leaky sinks** is always better than dealing with the aftermath. Here are some proactive measures you can take to minimize the risk of leaks:
* **Regular Inspections:** Periodically inspect your sink and plumbing for signs of leaks or corrosion.
* **Tighten Connections:** Regularly tighten any loose connections.
* **Replace Worn-Out Parts:** Replace worn-out washers, O-rings, and cartridges before they fail.
* **Use Quality Materials:** When replacing parts, use high-quality materials that are designed to last.
* **Avoid Harsh Chemicals:** Avoid pouring harsh chemicals down the drain, as they can corrode pipes.
The Environmental and Financial Impact of Leaky Sinks
A **leaky sink** might seem like a minor inconvenience, but it can have a significant impact on both the environment and your wallet. Even a small drip can waste gallons of water over time, leading to higher water bills and a strain on water resources. According to the EPA, household leaks can waste nearly 1 trillion gallons of water annually nationwide. Addressing a leaky sink promptly is not only responsible but also saves you money in the long run. Moreover, preventing water damage from leaks protects your home’s structure and prevents mold growth, which can pose health risks.
Advanced Plumbing Techniques for Complex Leaky Sink Repairs
For those with advanced plumbing knowledge, some complex leaky sink repairs might be attempted. These include:
* **Soldering Copper Pipes:** Requires skill and precision to create watertight seals.
* **Replacing Entire Drain Assemblies:** Involves disconnecting multiple components and ensuring proper alignment.
* **Working with Specialized Faucets:** High-end faucets may have unique components and repair procedures.
Always exercise caution and consult with a professional if you’re unsure about any aspect of these advanced repairs.
Leaky Sink: Frequently Asked Questions (Q&A)
Here are some frequently asked questions about leaky sinks, along with expert answers:
**Q1: Why is my new faucet leaking?**
**A:** Even new faucets can leak due to manufacturing defects, improper installation, or debris in the water lines. Check the connections and ensure the faucet is properly seated. Contact the manufacturer for warranty support if needed.
**Q2: Can a leaky sink cause mold?**
**A:** Yes, a leaky sink can create a damp environment that promotes mold growth. Mold can damage your home and pose health risks. Address leaks promptly and clean up any mold growth.
**Q3: What’s the best way to tighten a stubborn drain connection?**
**A:** Use a basin wrench for leverage and apply penetrating oil to loosen the nut. Be careful not to damage the pipe or fitting. If it’s still stuck, consider replacing the connection.
**Q4: How can I prevent my P-trap from freezing in the winter?**
**A:** Insulate the P-trap with pipe insulation or heat tape. Allow a small trickle of water to run continuously during extremely cold weather.
**Q5: Is it safe to use chemical drain cleaners to fix a slow drain that might be causing a leak?**
**A:** Chemical drain cleaners can damage pipes and worsen leaks. Use a drain snake or call a plumber to clear the clog safely.
**Q6: What type of sealant is best for sealing around a sink drain?**
**A:** Plumber’s putty is generally recommended for sealing around a sink drain. It creates a watertight seal and remains flexible.
**Q7: How often should I replace my faucet supply lines?**
**A:** Replace faucet supply lines every 5-10 years, or sooner if you notice any signs of wear or corrosion.
**Q8: Can hard water contribute to leaky sinks?**
**A:** Yes, hard water can cause mineral buildup that corrodes pipes and fittings, leading to leaks. Consider installing a water softener to reduce hard water’s effects.
**Q9: What are the signs of a hidden leak under my sink?**
**A:** Signs of a hidden leak include musty odors, water stains on the cabinet floor, and unexplained increases in your water bill.
**Q10: How do I know if I need to replace my entire sink drain assembly?**
**A:** If multiple components of the drain assembly are corroded or damaged, or if you’re experiencing persistent leaks despite repairs, it’s best to replace the entire assembly.
Conclusion: Taking Control of Your Leaky Sink
A **leaky sink** doesn’t have to be a source of stress and frustration. By understanding the components of your sink, diagnosing the problem correctly, and following our expert advice, you can effectively tackle many common leaks yourself. Remember to prioritize safety, use quality materials, and don’t hesitate to call a plumber when needed. Addressing leaks promptly saves water, protects your home, and ensures a worry-free plumbing system. We’ve shared our deep experience and expertise in this guide, and we encourage you to take the next step. Share your experiences with leaky sinks in the comments below, or explore our advanced guide to faucet repair for more in-depth information. Contact our experts for a consultation on leaky sink issues if you need personalized assistance.
