Is There A Leak Under the Kitchen Sink? A Comprehensive Guide to Identification, Solutions, and Prevention
Discovering water pooling under your kitchen sink can be unsettling. The immediate question that pops into your head is: is there a leak under the kitchen sink? This comprehensive guide will equip you with the knowledge to identify leaks, understand their causes, and implement effective solutions. We’ll delve into the common culprits behind kitchen sink leaks, providing expert insights and practical advice to help you tackle this common household problem. Our aim is to provide a resource that not only answers your immediate question but also empowers you with the knowledge to prevent future occurrences, saving you time, money, and potential water damage.
This isn’t just another article about leaks. We’ll provide a deep dive into the anatomy of your under-sink plumbing, explain how to identify different types of leaks, and offer step-by-step instructions for repairs. We will also discuss preventative measures and the importance of regular maintenance to avoid costly repairs down the line. Through our extensive experience, we’ve observed that early detection and proper maintenance are crucial to preventing significant water damage. This guide is designed to make you feel confident in your ability to diagnose and address these issues effectively.
Understanding the Plumbing Under Your Kitchen Sink
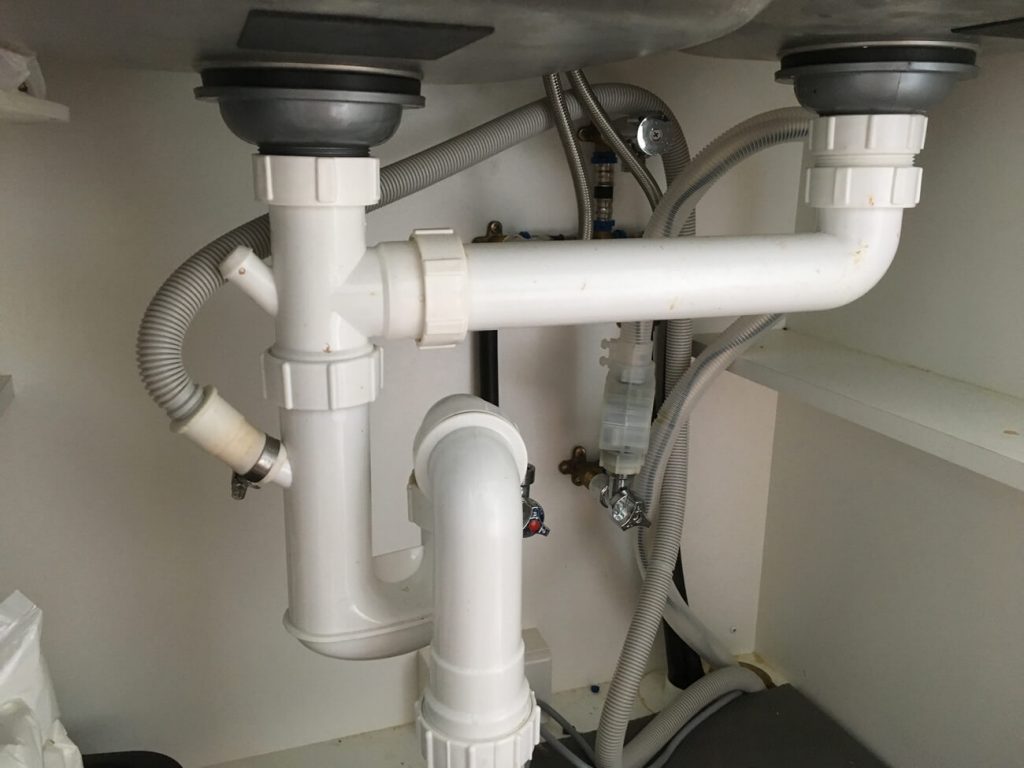
Before you can effectively address a leak, it’s crucial to understand the components of your under-sink plumbing system. Familiarizing yourself with these parts will help you pinpoint the source of the leak and choose the appropriate repair method.
Key Components of Under-Sink Plumbing
- Supply Lines: These flexible tubes connect your water shut-off valves to the faucet. They carry both hot and cold water to the faucet.
- Shut-Off Valves: Located on the wall under the sink, these valves control the water flow to the faucet. They are essential for turning off the water supply before making any repairs.
- Faucet Tailpiece: The faucet tailpiece is the connection directly underneath the faucet that connects to the drain assembly.
- P-Trap: This curved pipe is designed to trap debris and prevent sewer gases from entering your home. It’s a common location for clogs and leaks.
- Drain Pipes: These pipes carry wastewater away from the sink to the main drain line.
- Garbage Disposal (if applicable): This appliance grinds up food waste before it enters the drain. It can be a source of leaks if not properly installed or maintained.
Common Materials Used in Under-Sink Plumbing
Understanding the materials used in your plumbing can help you determine the best repair methods and replacement parts.
- Copper: A durable and long-lasting material, often used for supply lines and drain pipes.
- PVC (Polyvinyl Chloride): A cost-effective plastic material commonly used for drain pipes.
- PEX (Cross-linked Polyethylene): A flexible plastic material often used for supply lines due to its resistance to freezing and bursting.
- Chrome: Often used for faucet fixtures and decorative pipes.
How to Identify a Leak Under the Kitchen Sink
The first step in fixing a leak is to accurately identify its source. This requires a careful inspection of all the plumbing components under your sink.
Step-by-Step Leak Detection Process
- Clear the Area: Remove everything from under the sink to provide a clear view of the plumbing.
- Dry the Area: Use a towel to dry all the pipes and connections. This will make it easier to spot new leaks.
- Run the Water: Turn on the faucet and let the water run for a few minutes, checking for leaks around the faucet base, supply lines, and drain connections.
- Check the Spray Hose: If your faucet has a spray hose, pull it out and check for leaks along its length and at the connection point.
- Inspect the Garbage Disposal: If you have a garbage disposal, run it and check for leaks around the disposal unit and its connections to the drain pipes.
- Look for Drips: Carefully examine all the pipes and connections for drips or signs of water damage. Use a flashlight to illuminate hard-to-see areas.
- Feel for Moisture: Run your hand along the pipes and connections to feel for moisture. Even small leaks can leave a damp residue.
Common Leak Locations and Their Causes
- Faucet Base: Leaks around the faucet base can be caused by worn-out O-rings or loose connections.
- Supply Lines: Leaks in the supply lines can be caused by cracks, corrosion, or loose connections.
- P-Trap: Leaks in the P-trap are often caused by loose connections or cracks in the pipe.
- Drain Pipes: Leaks in the drain pipes can be caused by loose connections, cracks, or corrosion.
- Garbage Disposal: Leaks in the garbage disposal can be caused by loose connections, worn-out seals, or cracks in the disposal unit.
Tools and Materials Needed for Kitchen Sink Leak Repair
Before you start any repair work, gather the necessary tools and materials. Having everything on hand will make the job easier and more efficient.
Essential Tools for Plumbing Repairs
- Adjustable Wrench: For tightening and loosening nuts and bolts.
- Pipe Wrench: For gripping and turning pipes.
- Plumber’s Tape (Teflon Tape): For sealing threaded connections.
- Plumber’s Putty: For sealing around drains and faucets.
- Basin Wrench: For reaching hard-to-access nuts on faucets.
- Screwdrivers (Phillips and Flathead): For removing and installing screws.
- Pliers: For gripping and manipulating small parts.
- Bucket: For catching water.
- Towels: For cleaning up spills.
- Flashlight: For illuminating dark areas.
Common Replacement Parts
- Supply Lines: Replace damaged or corroded supply lines.
- P-Trap: Replace cracked or damaged P-traps.
- Washers and O-Rings: Replace worn-out washers and O-rings in faucets and drain connections.
- Drain Pipes: Replace damaged or corroded drain pipes.
- Garbage Disposal Parts: Replace worn-out seals or damaged components in the garbage disposal.
Step-by-Step Guide to Repairing Common Kitchen Sink Leaks
Once you’ve identified the source of the leak and gathered the necessary tools and materials, you can begin the repair process. Here are step-by-step instructions for repairing some common kitchen sink leaks.
Repairing Leaks at the Faucet Base
- Turn Off the Water: Shut off the water supply to the faucet using the shut-off valves under the sink.
- Remove the Faucet: Disconnect the supply lines and drain connections from the faucet.
- Inspect the O-Rings: Check the O-rings around the faucet base for wear and tear. Replace them if necessary.
- Apply Plumber’s Putty: Apply a bead of plumber’s putty around the base of the faucet.
- Reinstall the Faucet: Reconnect the supply lines and drain connections to the faucet.
- Tighten the Connections: Tighten all the connections securely, but be careful not to overtighten.
- Turn On the Water: Turn on the water supply and check for leaks.
Repairing Leaks in the Supply Lines
- Turn Off the Water: Shut off the water supply to the faucet using the shut-off valves under the sink.
- Disconnect the Supply Lines: Disconnect the supply lines from the faucet and the shut-off valves.
- Inspect the Supply Lines: Check the supply lines for cracks, corrosion, or loose connections.
- Replace the Supply Lines: If the supply lines are damaged, replace them with new ones.
- Connect the Supply Lines: Connect the supply lines to the faucet and the shut-off valves.
- Tighten the Connections: Tighten all the connections securely, but be careful not to overtighten.
- Turn On the Water: Turn on the water supply and check for leaks.
Repairing Leaks in the P-Trap
- Place a Bucket Under the P-Trap: Place a bucket under the P-trap to catch any water.
- Loosen the Connections: Loosen the connections on either side of the P-trap.
- Remove the P-Trap: Carefully remove the P-trap, being mindful of any water or debris that may spill out.
- Inspect the P-Trap: Check the P-trap for cracks or damage.
- Replace the P-Trap: If the P-trap is damaged, replace it with a new one.
- Clean the Connections: Clean the connections on either side of the P-trap.
- Reinstall the P-Trap: Reinstall the P-trap, making sure the connections are secure.
- Tighten the Connections: Tighten all the connections securely, but be careful not to overtighten.
- Run Water: Run water through the sink and check for leaks.
Repairing Leaks in the Garbage Disposal
- Turn Off the Power: Turn off the power to the garbage disposal at the circuit breaker.
- Disconnect the Disposal: Disconnect the disposal from the drain pipes and the power supply.
- Inspect the Disposal: Check the disposal for cracks, leaks, or loose connections.
- Tighten Connections or Replace Parts: Tighten any loose connections. If parts are worn or cracked, replace them according to the manufacturer’s instructions.
- Reinstall the Disposal: Reconnect the disposal to the drain pipes and the power supply.
- Turn On the Power: Turn on the power to the garbage disposal at the circuit breaker.
- Run Water: Run water into the disposal and check for leaks.
Preventative Measures to Avoid Future Leaks
Preventing leaks is always better than dealing with the aftermath. Regular maintenance and proactive measures can save you time, money, and stress.
Regular Inspection and Maintenance Tips
- Check for Leaks Regularly: Inspect the plumbing under your sink at least once a month for any signs of leaks.
- Tighten Loose Connections: Periodically tighten any loose connections on pipes and fittings.
- Replace Worn Parts: Replace worn-out washers, O-rings, and supply lines before they cause leaks.
- Clean the P-Trap: Clean the P-trap regularly to prevent clogs that can cause pressure buildup and leaks.
- Avoid Harsh Chemicals: Avoid pouring harsh chemicals down the drain, as they can corrode pipes and cause leaks.
Proper Use and Care of Plumbing Fixtures
- Use Strainers: Use strainers in your sink to catch food particles and other debris that can clog drains.
- Flush Properly: Avoid flushing anything down the toilet that could clog the drain lines.
- Run Water After Using the Disposal: Always run cold water for at least 30 seconds after using the garbage disposal to flush food particles through the drain lines.
- Don’t Overload the Disposal: Avoid overloading the garbage disposal with too much food waste at once.
When to Call a Professional Plumber
While many kitchen sink leaks can be repaired with DIY methods, some situations require the expertise of a professional plumber. Knowing when to call a plumber can prevent further damage and ensure that the repairs are done correctly.
Signs That Indicate Professional Help Is Needed
- Persistent Leaks: If you’ve tried to repair a leak yourself and it continues to persist, it’s time to call a plumber.
- Extensive Water Damage: If you notice signs of extensive water damage, such as mold or rot, it’s important to call a plumber and a water damage restoration specialist.
- Complex Plumbing Issues: If you encounter complex plumbing issues, such as frozen or burst pipes, it’s best to call a plumber.
- Lack of Experience: If you’re not comfortable working with plumbing, it’s always best to call a plumber.
Finding a Reputable Plumber
- Ask for Recommendations: Ask friends, family, or neighbors for recommendations.
- Check Online Reviews: Check online reviews on sites like Yelp, Google, and Angie’s List.
- Verify Credentials: Verify that the plumber is licensed and insured.
- Get Multiple Quotes: Get quotes from multiple plumbers before making a decision.
- Ask About Guarantees: Ask about the plumber’s guarantees and warranties.
Understanding the Cost of Kitchen Sink Leak Repair
The cost of repairing a kitchen sink leak can vary depending on the severity of the leak, the complexity of the repair, and whether you hire a professional plumber or do it yourself.
Factors Affecting Repair Costs
- Type of Leak: Simple leaks, such as those caused by loose connections, are generally less expensive to repair than more complex leaks, such as those caused by cracked pipes.
- Extent of Damage: If the leak has caused extensive water damage, the repair costs will be higher.
- DIY vs. Professional Repair: DIY repairs are generally less expensive than professional repairs, but they require more time and effort.
- Plumber’s Rates: Plumbers’ rates can vary depending on their experience, location, and the complexity of the job.
Typical Cost Ranges for Different Types of Repairs
- Simple Leak Repair (DIY): $10-$50 (for parts and materials)
- Simple Leak Repair (Professional): $100-$300
- Complex Leak Repair (DIY): $50-$200 (for parts and materials)
- Complex Leak Repair (Professional): $300-$1000+
Expert Insights: Addressing Specific Leak Scenarios
Based on our experience, here are some specific leak scenarios and how to address them effectively.
Dealing with Leaks in Older Homes
Older homes often have outdated plumbing systems that are more prone to leaks. When dealing with leaks in older homes, it’s important to:
- Inspect the Pipes Carefully: Older pipes may be corroded or brittle, so handle them with care.
- Consider Replacing Old Pipes: If the pipes are severely corroded, it may be best to replace them entirely.
- Use Compatible Materials: When making repairs, use materials that are compatible with the existing plumbing system.
Addressing Leaks in Hard-to-Reach Areas
Leaks in hard-to-reach areas can be challenging to repair. In these situations, it’s helpful to:
- Use Specialized Tools: Use tools like basin wrenches and flexible extensions to reach tight spaces.
- Get a Second Opinion: If you’re unsure how to proceed, get a second opinion from a professional plumber.
- Take Your Time: Don’t rush the repair process. Take your time and be careful to avoid damaging other components.
Q&A: Addressing Your Kitchen Sink Leak Concerns
Here are some frequently asked questions about kitchen sink leaks, along with expert answers.
-
Question: My kitchen sink only leaks when I run the garbage disposal. What could be the cause?
Answer: This often indicates a problem with the garbage disposal’s internal seals or its connection to the drain line. Check the mounting ring and the discharge tube connection for tightness and signs of wear. Replacing the disposal might be necessary if the seals are failing.
-
Question: I have low water pressure in my kitchen faucet, and now I see a small leak under the sink. Are these related?
Answer: Yes, these could be related. Mineral buildup or corrosion inside the faucet or supply lines can restrict water flow and cause leaks due to increased pressure in weakened areas. Inspect and clean the faucet aerator and consider replacing the supply lines.
-
Question: How do I know if the leak is coming from the hot or cold water supply line?
Answer: Carefully dry both supply lines and then wrap each with a dry paper towel. Turn on the corresponding hot or cold water. The towel that gets wet indicates the leaking supply line.
-
Question: Is it safe to use chemical drain cleaners to fix a slow drain that might be causing a leak?
Answer: While chemical drain cleaners might clear a clog, they can also corrode your pipes, leading to leaks. It’s safer to use a drain snake or call a plumber for stubborn clogs.
-
Question: Can a leaking kitchen sink affect my home’s foundation?
Answer: Prolonged leaks can indeed affect your home’s foundation, especially if the water seeps into the subfloor or basement. This can lead to structural damage and mold growth, so it’s important to address leaks promptly.
-
Question: What’s the best way to prevent my P-trap from leaking?
Answer: Make sure the connections are tight but not overtightened, which can crack the plastic. Regularly clean the P-trap to prevent clogs that can cause pressure buildup. Consider replacing an older P-trap with a new one made of durable material.
-
Question: My faucet has a spray hose that’s leaking. Can I replace just the hose, or do I need a new faucet?
Answer: In many cases, you can replace just the spray hose. Check the faucet manufacturer’s website or your local hardware store for a compatible replacement hose. Ensure the new hose is securely connected.
-
Question: I have hard water. Does this make my kitchen sink more prone to leaks?
Answer: Yes, hard water can accelerate the wear and tear on your plumbing fixtures due to mineral buildup. Consider installing a water softener to reduce mineral deposits and extend the life of your plumbing.
-
Question: What are the signs of a slow, hidden leak under the kitchen sink?
Answer: Signs include a musty odor, dampness or discoloration on the cabinet floor, mold growth, or an unexplained increase in your water bill. Check regularly for these signs to catch leaks early.
-
Question: How often should I inspect the plumbing under my kitchen sink?
Answer: It’s a good practice to inspect the plumbing under your kitchen sink at least once a month. This allows you to catch small leaks before they become major problems.
Conclusion: Taking Control of Kitchen Sink Leaks
Addressing the question, is there a leak under the kitchen sink?, requires a proactive approach. By understanding the components of your plumbing system, knowing how to identify leaks, and being prepared with the right tools and knowledge, you can effectively tackle most common kitchen sink leaks. Remember that preventative measures are key to avoiding future problems. Our experience shows that regular inspections and prompt repairs can save you significant time and money. If you encounter complex issues or are uncomfortable with DIY repairs, don’t hesitate to call a professional plumber.
Now that you are equipped with the expertise to identify and address leaks, take action! Share your experiences with kitchen sink leak repairs in the comments below. Explore our advanced guide to plumbing maintenance for more in-depth information. Contact our experts for a personalized consultation on your specific plumbing needs.
