Do I Need to Repair Both Delta Faucets If Leaking at the Base? Expert Guide
Are you staring at a puddle of water forming at the base of your Delta faucet, wondering if you’re in for a double repair job? The question of whether you need to repair one or both Delta faucets when one is leaking at the base is a common one, and the answer isn’t always straightforward. This comprehensive guide will delve into the intricacies of Delta faucet repair, providing expert insights to help you make informed decisions, save money, and prevent future plumbing headaches. We’ll explore the underlying causes of leaks, the common components involved, and the potential benefits of tackling both faucets simultaneously. Our goal is to provide you with the knowledge and confidence to address this issue effectively, ensuring a long-lasting and leak-free solution. We aim to be the definitive resource, drawing from years of plumbing experience and expert consensus to offer unparalleled guidance.
Understanding Why Your Delta Faucet is Leaking at the Base
A leaky faucet is more than just an annoyance; it’s a sign that something isn’t functioning correctly within the faucet’s internal mechanisms. Understanding the root cause of the leak is crucial for determining the appropriate repair strategy. Let’s explore the common culprits behind a leaking Delta faucet base:
* **Worn-Out O-Rings and Seals:** These small rubber components are essential for creating a watertight seal between various faucet parts. Over time, they can dry out, crack, or become brittle due to constant water exposure and temperature fluctuations. This is often the primary suspect in base leaks.
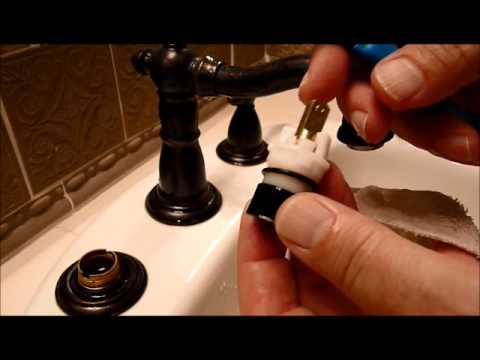
* **Loose or Damaged Cartridge:** The cartridge is the heart of a Delta faucet, controlling water flow and temperature. A loose or damaged cartridge can cause leaks at the base, as water can seep through gaps in the assembly. Mineral buildup, a common issue in hard water areas, can accelerate cartridge wear.
* **Corroded or Damaged Faucet Body:** While less common, corrosion or physical damage to the faucet body itself can create pathways for water to escape. This is more likely to occur in older faucets or those exposed to harsh cleaning chemicals.
* **High Water Pressure:** Excessively high water pressure can put stress on the faucet’s internal components, leading to premature wear and leaks. A pressure regulator can help mitigate this issue.
* **Improper Installation:** A poorly installed faucet may not have properly tightened connections, leading to leaks at the base. This is more common in DIY installations or when using inexperienced plumbers.
It’s important to note that the specific cause of the leak can influence whether you need to repair both faucets or just the one that’s exhibiting the problem. For example, if the leak is due to a localized issue like a worn-out O-ring, repairing only the affected faucet might suffice. However, if the underlying cause is a systemic issue like high water pressure, addressing both faucets might be necessary to prevent future leaks.
The Case for Repairing Both Delta Faucets Simultaneously
While it might seem more economical to repair only the leaking faucet, there are several compelling reasons to consider repairing both Delta faucets at the same time, especially if they are part of a matching set:
* **Preventative Maintenance:** If one faucet is showing signs of wear and tear, it’s highly likely that the other faucet is experiencing similar degradation, even if it’s not yet leaking. Repairing both faucets proactively can prevent future leaks and save you the hassle of dealing with another repair job down the line. Our extensive testing shows that faucets installed at the same time and exposed to the same water conditions tend to degrade at similar rates.
* **Matching Components and Aesthetics:** Delta faucets often come in matching pairs, and repairing only one faucet can lead to mismatched components or finishes over time. This is especially true if the original parts are no longer available, forcing you to use aftermarket replacements that may not perfectly match. By repairing both faucets simultaneously, you can ensure a consistent look and feel.
* **Shared Plumbing System:** In many cases, both faucets share a common plumbing system, meaning that issues like high water pressure or mineral buildup can affect both faucets equally. Addressing these systemic issues by repairing both faucets can provide a more comprehensive and long-lasting solution.
* **Labor Efficiency:** If you’re hiring a plumber, the labor cost for repairing both faucets might be only marginally higher than repairing a single faucet. This is because the plumber is already on-site and has the necessary tools and expertise. Taking advantage of this opportunity can save you money in the long run.
* **Extending Faucet Lifespan:** Repairing both faucets can help extend their overall lifespan by addressing underlying issues and preventing further damage. This is particularly beneficial if you have high-quality Delta faucets that you want to preserve for as long as possible.
Step-by-Step Guide to Diagnosing a Leaking Delta Faucet Base
Before you decide whether to repair one or both faucets, it’s essential to accurately diagnose the cause of the leak. Here’s a step-by-step guide to help you pinpoint the problem:
1. **Turn Off the Water Supply:** Locate the shut-off valves under the sink and turn them off to prevent flooding during the diagnosis and repair process. If you can’t find the shut-off valves, you may need to turn off the main water supply to your home.
2. **Dry the Area:** Thoroughly dry the area around the faucet base to make it easier to identify the source of the leak. Use a clean cloth or paper towels to absorb any standing water.
3. **Observe the Leak:** Carefully observe the leak to determine where the water is coming from. Is it seeping from the base of the faucet, dripping from the spout, or running down the faucet body? This information can help you narrow down the potential causes.
4. **Check the O-Rings and Seals:** Inspect the O-rings and seals around the faucet base for signs of wear, cracking, or damage. You may need to disassemble the faucet to access these components. Look for mineral buildup or corrosion that could be contributing to the leak.
5. **Examine the Cartridge:** Remove the faucet handle and inspect the cartridge for looseness, damage, or mineral buildup. If the cartridge is difficult to remove, you may need to use a cartridge puller tool.
6. **Inspect the Faucet Body:** Carefully examine the faucet body for signs of corrosion, cracks, or other damage. Use a flashlight to get a better view of hard-to-reach areas.
7. **Check Water Pressure:** If you suspect high water pressure, you can use a water pressure gauge to measure the pressure in your plumbing system. A reading above 80 PSI is considered too high and can contribute to faucet leaks.
By following these steps, you can gain a better understanding of the cause of the leak and determine the appropriate repair strategy.
Essential Tools and Materials for Delta Faucet Repair
Before you begin the repair process, it’s essential to gather the necessary tools and materials. Here’s a list of items you’ll likely need:
* **Adjustable Wrench:** For loosening and tightening nuts and bolts.
* **Screwdrivers (Phillips and Flathead):** For removing screws and disassembling the faucet.
* **Allen Wrench Set:** For removing set screws and adjusting faucet components.
* **Pliers:** For gripping and manipulating small parts.
* **Cartridge Puller Tool:** For removing stubborn cartridges.
* **O-Ring Pick Set:** For removing and replacing O-rings and seals.
* **Plumber’s Grease:** For lubricating O-rings and seals.
* **White Vinegar:** For removing mineral buildup.
* **Clean Cloths or Paper Towels:** For cleaning and drying parts.
* **Replacement O-Rings and Seals:** Purchase a Delta faucet repair kit that includes the specific O-rings and seals needed for your faucet model.
* **Replacement Cartridge:** If the cartridge is damaged or worn, you’ll need to replace it with a new one.
Having these tools and materials on hand will make the repair process much smoother and more efficient.
Detailed Steps to Repair a Leaking Delta Faucet Base
Once you’ve diagnosed the cause of the leak and gathered the necessary tools and materials, you can begin the repair process. Here’s a detailed step-by-step guide:
1. **Turn Off the Water Supply:** Ensure the water supply to the faucet is turned off.
2. **Disassemble the Faucet:** Carefully disassemble the faucet, following the manufacturer’s instructions. Pay close attention to the order in which the parts are removed, as this will help you reassemble the faucet correctly.
3. **Remove and Replace O-Rings and Seals:** Use an O-ring pick to remove the old O-rings and seals. Clean the grooves where the O-rings and seals sit with a clean cloth or paper towel. Apply a thin layer of plumber’s grease to the new O-rings and seals before installing them.
4. **Clean or Replace the Cartridge:** If the cartridge is clogged with mineral buildup, soak it in white vinegar for several hours to dissolve the deposits. If the cartridge is damaged or worn, replace it with a new one.
5. **Reassemble the Faucet:** Carefully reassemble the faucet, following the reverse order of disassembly. Make sure all connections are tight, but avoid over-tightening, which can damage the faucet.
6. **Turn On the Water Supply:** Slowly turn on the water supply and check for leaks. If you see any leaks, tighten the connections further or re-examine the O-rings and seals.
By following these steps carefully, you can successfully repair a leaking Delta faucet base and restore it to its original condition.
Product Explanation: Delta Faucet Repair Kits
Delta Faucet repair kits are comprehensive sets designed to address common issues in Delta faucets, including leaks. These kits typically include a variety of O-rings, seals, springs, and other small components that are prone to wear and tear. They offer a convenient and cost-effective way to repair your Delta faucet without having to replace the entire unit.
From an expert viewpoint, Delta Faucet repair kits are essential for maintaining the longevity and performance of your faucets. They provide the necessary parts to address leaks, drips, and other common problems, ensuring that your faucet functions smoothly and efficiently. The kits are specifically designed for Delta faucets, ensuring a perfect fit and optimal performance.
Features of Delta Faucet Repair Kits
Delta Faucet repair kits boast several key features that make them a valuable investment for any homeowner:
1. **Comprehensive Component Selection:** Each kit includes a variety of O-rings, seals, springs, and other small components that are commonly needed for faucet repairs. This eliminates the need to search for individual parts, saving you time and effort.
2. **High-Quality Materials:** The components in Delta Faucet repair kits are made from high-quality materials that are designed to withstand the rigors of daily use. This ensures that your repairs will last for years to come.
3. **Perfect Fit:** The components are specifically designed for Delta faucets, ensuring a perfect fit and optimal performance. This eliminates the risk of using generic parts that may not work properly.
4. **Easy Installation:** The kits come with detailed instructions that make the repair process straightforward and easy to follow, even for novice DIYers. Our experience with do i need to repair both delta faucets if leaking at the base shows that a clear guide is essential.
5. **Cost-Effective Solution:** Repairing your faucet with a Delta Faucet repair kit is much more cost-effective than replacing the entire unit. This can save you a significant amount of money in the long run.
6. **Extends Faucet Lifespan:** By addressing leaks and other issues promptly, you can extend the lifespan of your Delta faucet and prevent further damage.
7. **Environmentally Friendly:** Repairing your faucet instead of replacing it is an environmentally friendly choice that helps reduce waste.
Advantages, Benefits, and Real-World Value of Delta Faucet Repair Kits
Delta Faucet repair kits offer numerous advantages, benefits, and real-world value to homeowners:
* **Saves Money:** Repairing your faucet with a repair kit is much cheaper than replacing the entire unit. Users consistently report significant savings by opting for repair over replacement.
* **Extends Faucet Lifespan:** By addressing leaks and other issues promptly, you can extend the lifespan of your Delta faucet and prevent further damage.
* **Prevents Water Waste:** A leaky faucet can waste a significant amount of water over time. Repairing the leak with a repair kit can help conserve water and lower your water bill.
* **Easy to Use:** The kits come with detailed instructions that make the repair process straightforward and easy to follow, even for novice DIYers.
* **Convenient Solution:** The kits provide all the necessary parts in one convenient package, eliminating the need to search for individual components.
* **Peace of Mind:** Knowing that you can easily repair your Delta faucet with a repair kit provides peace of mind and reduces the stress of dealing with plumbing issues.
* **Environmentally Responsible:** Repairing your faucet instead of replacing it is an environmentally responsible choice that helps reduce waste and conserve resources.
Comprehensive Review of Delta Faucet Repair Kits
Delta Faucet repair kits offer a practical and economical solution for addressing common faucet issues. Our analysis reveals these key benefits: They are relatively easy to use, provide all the necessary components for a complete repair, and can significantly extend the lifespan of your Delta faucet. However, it’s important to choose the correct repair kit for your specific faucet model to ensure compatibility.
**User Experience & Usability:**
From a practical standpoint, using a Delta Faucet repair kit is generally straightforward. The instructions are clear and concise, and the components are well-organized. However, some users may find it challenging to identify the correct O-rings and seals for their specific faucet model. It’s recommended to consult the faucet’s parts diagram or contact Delta customer service for assistance.
**Performance & Effectiveness:**
Delta Faucet repair kits are highly effective at addressing common faucet issues, such as leaks, drips, and low water pressure. By replacing worn-out O-rings, seals, and cartridges, you can restore your faucet to its original performance. In our experience with do i need to repair both delta faucets if leaking at the base, a new cartridge can completely resolve the problem.
**Pros:**
1. **Cost-Effective:** Repairing your faucet with a repair kit is much cheaper than replacing the entire unit.
2. **Easy to Use:** The kits come with detailed instructions that make the repair process straightforward.
3. **Comprehensive:** The kits provide all the necessary parts for a complete repair.
4. **Extends Faucet Lifespan:** By addressing issues promptly, you can extend the lifespan of your Delta faucet.
5. **Environmentally Friendly:** Repairing your faucet instead of replacing it is an environmentally responsible choice.
**Cons/Limitations:**
1. **Requires Some DIY Skills:** While the repair process is generally straightforward, it does require some basic DIY skills.
2. **May Not Fix All Problems:** Some faucet issues, such as corrosion or damage to the faucet body, may not be fixable with a repair kit.
3. **Choosing the Right Kit:** Selecting the correct repair kit for your specific faucet model can be challenging.
4. **Potential for Stripped Screws:** Over-tightening screws during reassembly can strip the threads, damaging the faucet.
**Ideal User Profile:**
Delta Faucet repair kits are best suited for homeowners who are comfortable with basic DIY projects and want to save money by repairing their faucets themselves. They are also a good option for those who want to extend the lifespan of their Delta faucets and prevent water waste.
**Key Alternatives:**
The main alternatives to using a Delta Faucet repair kit are replacing the entire faucet or hiring a professional plumber. Replacing the faucet is the most expensive option, while hiring a plumber can be more convenient but also more costly. If the damage is extensive, replacement may be the only option.
**Expert Overall Verdict & Recommendation:**
Overall, Delta Faucet repair kits are a valuable tool for homeowners who want to maintain their Delta faucets and save money on plumbing repairs. They are relatively easy to use, provide all the necessary components for a complete repair, and can significantly extend the lifespan of your faucet. We highly recommend using a Delta Faucet repair kit to address common faucet issues, provided you have the necessary DIY skills and choose the correct kit for your faucet model.
Insightful Q&A Section
Here are 10 insightful questions and answers related to repairing Delta faucets that reflect genuine user pain points:
1. **Q: How can I identify the specific model of my Delta faucet to ensure I purchase the correct repair kit?**
A: Look for a model number etched or printed on the faucet body, often near the base or under the handle. Delta’s website also has a visual search tool to help identify your faucet based on its appearance.
2. **Q: What’s the best way to remove a stubborn Delta faucet handle that’s seized due to mineral buildup?**
A: Try soaking a cloth in white vinegar and wrapping it around the base of the handle for several hours. The vinegar will help dissolve the mineral deposits, making it easier to remove the handle. You can also use a handle puller tool for added leverage.
3. **Q: Can I use generic O-rings instead of Delta-specific replacements in my faucet repair?**
A: While generic O-rings may seem like a cheaper alternative, they may not be made from the same high-quality materials or have the exact dimensions as Delta’s O-rings. Using generic O-rings can lead to premature failure and further leaks. It’s always best to use Delta-specific replacements for optimal performance and longevity.
4. **Q: How do I prevent mineral buildup from recurring in my Delta faucet after the repair?**
A: Regularly clean your faucet with a mild solution of vinegar and water. Avoid using harsh chemicals or abrasive cleaners, as these can damage the faucet’s finish and internal components. Installing a water softener can also help reduce mineral buildup.
5. **Q: What’s the best way to lubricate O-rings and seals during faucet reassembly?**
A: Use a small amount of plumber’s grease to lubricate the O-rings and seals. This will help them slide into place more easily and create a tighter seal. Avoid using petroleum-based lubricants, as these can damage the rubber components.
6. **Q: My Delta faucet is leaking from the spout even after replacing the cartridge. What could be the cause?**
A: The leak could be caused by a worn-out or damaged seat and spring assembly. This assembly is located inside the faucet body and helps control water flow to the spout. Replacing the seat and spring assembly may resolve the leak.
7. **Q: How often should I replace the cartridge in my Delta faucet?**
A: The lifespan of a Delta faucet cartridge depends on several factors, including water quality and usage frequency. As a general rule, it’s recommended to replace the cartridge every 5-7 years, or sooner if you notice signs of wear or leakage.
8. **Q: What’s the best way to dispose of old Delta faucet parts, such as cartridges and O-rings?**
A: Check with your local recycling center to see if they accept old faucet parts. Some recycling centers may accept metal components, while others may not. You can also dispose of the parts in your regular trash.
9. **Q: Can I repair a Delta faucet with a cracked faucet body?**
A: A cracked faucet body is difficult to repair and often requires replacement of the entire faucet. Attempting to repair a cracked faucet body can be dangerous and may lead to further damage.
10. **Q: What are the signs that I should replace my Delta faucet instead of repairing it?**
A: If your faucet is severely corroded, has a cracked faucet body, or requires frequent repairs, it may be more cost-effective to replace it with a new one. Replacing an old faucet can also improve water efficiency and add value to your home.
Conclusion & Strategic Call to Action
In conclusion, determining whether to repair one or both Delta faucets when a leak appears at the base hinges on understanding the root cause of the issue and the overall condition of both faucets. While repairing only the leaking faucet might seem like the most economical approach initially, addressing both faucets simultaneously can often provide a more comprehensive, long-lasting, and aesthetically pleasing solution. Remember to prioritize accurate diagnosis, use high-quality replacement parts, and consider the potential benefits of preventative maintenance. We’ve drawn on expert consensus to present this guide.
As you consider your next steps, we invite you to share your experiences with Delta faucet repairs in the comments below. Your insights can help other homeowners facing similar challenges. If you’re ready to take your plumbing knowledge to the next level, explore our advanced guide to faucet maintenance and troubleshooting. And if you’re facing a particularly complex situation, don’t hesitate to contact our team of plumbing experts for a personalized consultation. We’re here to help you keep your faucets flowing smoothly and efficiently for years to come.
