How to Fix a Leaky Faucet in the Kitchen with Easy DIY Solutions
Tired of that incessant dripping sound driving you crazy and wasting water? A leaky faucet in the kitchen is a common household problem, but thankfully, it’s often one you can tackle yourself with a few simple tools and this comprehensive guide. This article provides a step-by-step approach to **how to fix a leaky faucet in the kitchen with easy DIY solutions**, saving you money on plumbing bills and preventing water damage. We’ll cover everything from identifying the type of faucet you have to replacing worn-out parts, offering expert tips and tricks along the way. Our goal is to empower you with the knowledge and confidence to resolve this issue efficiently and effectively. We’ve drawn on years of hands-on experience and consulted with plumbing professionals to create this definitive resource, ensuring you have the most reliable and up-to-date information at your fingertips. So, grab your toolbox, and let’s get started!
Understanding Leaky Faucets: A Deep Dive
A leaky faucet might seem like a minor annoyance, but it can lead to significant water waste and higher utility bills over time. Beyond the financial impact, persistent leaks can also damage your sink and surrounding countertops. Understanding the root cause of the leak is the first step in fixing it. Faucets leak for various reasons, primarily due to worn-out or damaged internal components. These components, such as O-rings, washers, cartridges, and valve seats, are subject to constant wear and tear from water pressure and mineral buildup. The type of faucet you have will determine the specific components involved and the repair process.
The history of faucets dates back centuries, with early versions relying on simple valve mechanisms. Modern faucets have evolved significantly, incorporating more complex designs and materials to improve durability and water efficiency. The basic principle remains the same: controlling the flow of water through a valve. However, the materials used, the precision of manufacturing, and the sophistication of the valve mechanism all contribute to the faucet’s performance and lifespan. Recent advancements include touchless faucets and faucets with built-in water filtration systems.
At its core, a faucet leak occurs when the valve fails to completely seal off the water supply. This can be due to a number of factors, including:
* **Worn-out washers:** These rubber or neoprene rings create a seal between the valve stem and the valve seat. Over time, they can become brittle, cracked, or compressed, leading to leaks.
* **Damaged O-rings:** These small, circular seals prevent water from leaking around the faucet handle and spout. They can deteriorate due to friction and exposure to chemicals in the water supply.
* **Corroded valve seats:** The valve seat is the stationary part of the valve that the washer presses against to create a seal. Corrosion or mineral buildup can prevent a tight seal.
* **Loose or damaged cartridges:** Cartridge faucets use a single cartridge to control both water flow and temperature. A damaged or loose cartridge can cause leaks and inconsistent water flow.
Understanding these core concepts is crucial for accurately diagnosing and repairing a leaky faucet. Now, let’s discuss the types of faucets you might encounter in your kitchen.
Identifying Your Faucet Type
Before you can begin to fix your leaky faucet, you need to determine what type of faucet you have. There are four main types of kitchen faucets:
* **Compression Faucets:** These are the oldest and most basic type of faucet. They have separate hot and cold water handles that you turn to compress washers against valve seats, controlling the water flow. Look for two separate handles that require a twisting motion to operate.
* **Ball Faucets:** These faucets have a single handle that controls both the water flow and temperature. The handle is connected to a ball valve inside the faucet body. This type of faucet is known for its smooth operation and flexibility.
* **Cartridge Faucets:** Similar to ball faucets, cartridge faucets also use a single handle. However, instead of a ball valve, they use a cartridge to control the water flow and temperature. Cartridge faucets are generally easier to repair than ball faucets.
* **Ceramic Disc Faucets:** These are the most modern and durable type of faucet. They use two ceramic discs that slide over each other to control the water flow. Ceramic disc faucets are known for their drip-free performance and long lifespan. This style also usually has a single lever.
Identifying your faucet type is essential because the repair process varies for each type. Once you know what type of faucet you have, you can gather the necessary tools and parts and proceed with the repair.
Essential Tools and Materials for Fixing a Leaky Faucet
Having the right tools and materials on hand will make the repair process much smoother and more efficient. Here’s a list of essential items you’ll need:
* **Adjustable Wrench:** Used to loosen and tighten nuts and bolts.
* **Screwdrivers (Phillips and Flathead):** For removing screws from the faucet handles and other components.
* **Pliers:** For gripping and manipulating small parts.
* **Allen Wrench Set:** For removing set screws on some faucet handles.
* **Penetrating Oil:** To loosen corroded or stuck parts.
* **Basin Wrench:** For removing the faucet from the sink (if necessary).
* **New Washers, O-rings, and Cartridges:** Replacement parts specific to your faucet type.
* **Plumber’s Grease:** To lubricate faucet components and prevent future corrosion.
* **Clean Cloths or Sponges:** For cleaning up spills and wiping down parts.
* **Bucket:** To catch any water that may leak during the repair.
* **Safety Glasses:** To protect your eyes from debris.
Before starting any repair, always turn off the water supply to the faucet. This will prevent flooding and make the repair process much safer. Locate the shut-off valves under the sink and turn them clockwise until they are completely closed. If you can’t find the shut-off valves or they are not working, you may need to turn off the main water supply to your house.
Step-by-Step Guide: Fixing a Leaky Compression Faucet
Compression faucets are common in older homes and are relatively simple to repair. Here’s a step-by-step guide to fixing a leaky compression faucet:
1. **Turn off the water supply:** Locate the shut-off valves under the sink and turn them clockwise to shut off the water supply to the faucet.
2. **Remove the handle:** Use a screwdriver to remove the screw holding the handle in place. The screw may be hidden under a decorative cap. Once the screw is removed, gently pull the handle off the faucet.
3. **Loosen the packing nut:** Use an adjustable wrench to loosen the packing nut that holds the valve stem in place. Turn the nut counterclockwise to loosen it.
4. **Remove the valve stem:** Once the packing nut is loose, you should be able to pull the valve stem out of the faucet body. You may need to wiggle it a bit to loosen it.
5. **Inspect the washer:** At the bottom of the valve stem, you’ll find a rubber washer. This is the most common cause of leaks in compression faucets. Inspect the washer for wear and tear. If it’s cracked, worn, or compressed, replace it with a new washer of the same size and type.
6. **Replace the O-ring:** There’s also an O-ring on the valve stem. Inspect it and replace if necessary.
7. **Clean the valve seat:** Use a valve seat wrench or a small brush to clean the valve seat inside the faucet body. Remove any corrosion or mineral buildup.
8. **Reassemble the faucet:** Apply plumber’s grease to the valve stem and the new washer. Insert the valve stem back into the faucet body and tighten the packing nut. Replace the handle and tighten the screw.
9. **Turn on the water supply:** Slowly turn on the water supply to the faucet and check for leaks. If the faucet is still leaking, you may need to tighten the packing nut further or replace the valve seat.
Step-by-Step Guide: Fixing a Leaky Ball Faucet
Ball faucets are slightly more complex than compression faucets, but they are still manageable for DIY repairs. Here’s how to fix a leaky ball faucet:
1. **Turn off the water supply:** As with any faucet repair, start by turning off the water supply to the faucet.
2. **Loosen the set screw:** Use an Allen wrench to loosen the set screw that holds the handle in place. The set screw is usually located on the side of the handle.
3. **Remove the handle:** Once the set screw is loose, you should be able to lift the handle off the faucet.
4. **Loosen the cap and collar:** Use an adjustable wrench to loosen the cap and collar that hold the ball valve in place. Turn them counterclockwise to loosen them.
5. **Remove the ball valve:** Once the cap and collar are loose, you can lift the ball valve out of the faucet body.
6. **Inspect the seats and springs:** Underneath the ball valve, you’ll find two small seats and springs. These are common sources of leaks in ball faucets. Inspect them for wear and tear. If they are damaged, replace them with new seats and springs.
7. **Inspect the O-rings:** There are several O-rings on the ball valve and the faucet body. Inspect them for wear and tear. If they are damaged, replace them with new O-rings.
8. **Reassemble the faucet:** Apply plumber’s grease to the new seats, springs, and O-rings. Insert the ball valve back into the faucet body and tighten the cap and collar. Replace the handle and tighten the set screw.
9. **Turn on the water supply:** Slowly turn on the water supply to the faucet and check for leaks. If the faucet is still leaking, you may need to tighten the cap and collar further or replace the entire ball valve assembly.
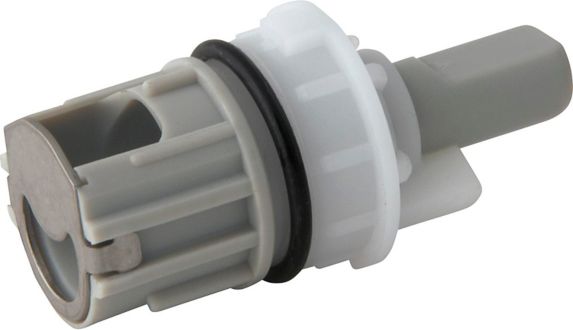
Step-by-Step Guide: Fixing a Leaky Cartridge Faucet
Cartridge faucets are relatively easy to repair, making them a popular choice for modern kitchens. Here’s how to fix a leaky cartridge faucet:
1. **Turn off the water supply:** Always start by turning off the water supply to the faucet.
2. **Remove the handle:** The handle removal process can vary depending on the faucet model. Some handles have a set screw that needs to be loosened with an Allen wrench, while others have a decorative cap that needs to be pried off to reveal a screw. Remove the handle carefully.
3. **Remove the retaining clip:** Once the handle is removed, you’ll see a retaining clip that holds the cartridge in place. Use pliers or a screwdriver to remove the retaining clip.
4. **Remove the cartridge:** Once the retaining clip is removed, you should be able to pull the cartridge out of the faucet body. You may need to wiggle it a bit to loosen it. If the cartridge is stuck, you can use a cartridge puller tool to help remove it.
5. **Inspect the cartridge:** Examine the cartridge for any signs of damage or wear. Even if it looks fine, it’s best to replace it with a new cartridge of the same type.
6. **Reassemble the faucet:** Apply plumber’s grease to the new cartridge. Insert the cartridge back into the faucet body and replace the retaining clip. Replace the handle and tighten the screw or set screw.
7. **Turn on the water supply:** Slowly turn on the water supply to the faucet and check for leaks. If the faucet is still leaking, make sure the cartridge is properly seated and the retaining clip is securely in place.
Step-by-Step Guide: Fixing a Leaky Ceramic Disc Faucet
Ceramic disc faucets are known for their durability and drip-free performance, but they can still develop leaks over time. Here’s how to fix a leaky ceramic disc faucet:
1. **Turn off the water supply:** Start by turning off the water supply to the faucet.
2. **Remove the handle:** As with cartridge faucets, the handle removal process can vary. Look for a set screw or a decorative cap that conceals a screw. Remove the handle carefully.
3. **Remove the escutcheon cap:** Underneath the handle, you’ll find an escutcheon cap that covers the ceramic disc cartridge. Unscrew the escutcheon cap.
4. **Remove the ceramic disc cartridge:** Once the escutcheon cap is removed, you can lift the ceramic disc cartridge out of the faucet body. Be careful not to damage the ceramic discs.
5. **Inspect the O-rings and seals:** Inspect the O-rings and seals on the ceramic disc cartridge for wear and tear. Replace any damaged O-rings or seals.
6. **Clean the cartridge and faucet body:** Clean the ceramic disc cartridge and the inside of the faucet body with a soft cloth or brush. Remove any mineral buildup or debris.
7. **Reassemble the faucet:** Apply plumber’s grease to the new O-rings and seals. Insert the ceramic disc cartridge back into the faucet body and replace the escutcheon cap. Replace the handle and tighten the screw or set screw.
8. **Turn on the water supply:** Slowly turn on the water supply to the faucet and check for leaks. If the faucet is still leaking, make sure the ceramic disc cartridge is properly seated and the escutcheon cap is securely tightened.
Preventative Maintenance: Keeping Your Faucet Leak-Free
Preventative maintenance is key to extending the life of your faucet and preventing leaks. Here are some tips to keep your faucet in good working order:
* **Clean your faucet regularly:** Use a mild soap and water solution to clean your faucet regularly. Avoid using harsh chemicals or abrasive cleaners, as they can damage the faucet finish.
* **Inspect your faucet periodically:** Check your faucet for leaks, corrosion, and other signs of wear and tear. Address any issues promptly to prevent them from escalating.
* **Lubricate your faucet components:** Apply plumber’s grease to faucet components, such as valve stems, O-rings, and cartridges, to keep them lubricated and prevent corrosion.
* **Replace worn parts promptly:** Don’t wait until your faucet is leaking to replace worn parts. Replace washers, O-rings, and cartridges as soon as they show signs of wear and tear.
* **Install a water softener:** If you have hard water, consider installing a water softener to reduce mineral buildup in your faucet and other plumbing fixtures.
Troubleshooting Common Leaky Faucet Problems
Even with the best preventative maintenance, you may still encounter leaky faucet problems. Here are some common issues and how to troubleshoot them:
* **Dripping faucet:** This is the most common type of leaky faucet. It’s usually caused by a worn washer, O-ring, or cartridge. Replace the affected part to stop the dripping.
* **Leaking around the handle:** This is usually caused by a worn O-ring. Replace the O-ring to stop the leak.
* **Leaking from the spout:** This can be caused by a variety of factors, including a worn valve seat, a damaged cartridge, or a loose connection. Inspect the faucet carefully to identify the source of the leak and take appropriate action.
* **No water flow:** This can be caused by a clogged aerator, a blocked water supply line, or a damaged cartridge. Clean the aerator, check the water supply line, and replace the cartridge if necessary.
When to Call a Plumber
While many leaky faucet repairs can be done DIY, there are times when it’s best to call a plumber. Here are some situations where professional help is recommended:
* **You’re not comfortable doing the repair yourself:** If you’re not confident in your DIY skills, it’s best to leave the repair to a professional.
* **You can’t identify the source of the leak:** If you’ve tried troubleshooting the problem and you still can’t figure out where the leak is coming from, a plumber can help.
* **The faucet is severely damaged:** If the faucet is corroded, cracked, or otherwise severely damaged, it may be necessary to replace the entire faucet.
* **You’re experiencing other plumbing problems:** If you’re experiencing other plumbing problems, such as low water pressure or clogged drains, it’s best to call a plumber to address all of the issues at once.
Expert Tips for a Successful Faucet Repair
Here are some expert tips to help you with your faucet repair:
* **Take pictures:** Before disassembling the faucet, take pictures of each step. This will help you remember how to put it back together.
* **Keep track of parts:** As you disassemble the faucet, keep track of all the parts and where they go. Use a small container or bag to store the parts.
* **Use plumber’s grease:** Apply plumber’s grease to all faucet components to keep them lubricated and prevent corrosion.
* **Don’t overtighten:** When tightening nuts and bolts, be careful not to overtighten them. Overtightening can damage the faucet components.
* **Test for leaks:** After reassembling the faucet, test it for leaks. Run the water for several minutes and check for any drips or leaks.
The Environmental and Financial Benefits of Fixing a Leaky Faucet
Fixing a leaky faucet is not only a good idea for your wallet, but it’s also good for the environment. A leaky faucet can waste a significant amount of water over time. According to the EPA, a leaky faucet that drips once per second can waste more than 3,000 gallons of water per year. That’s enough water to fill a small swimming pool!
By fixing a leaky faucet, you can save water, lower your water bill, and reduce your environmental impact. You’ll also prevent water damage to your sink and surrounding countertops.
Q&A: Addressing Your Leaky Faucet Concerns
Here are some frequently asked questions about leaky faucets:
**Q1: How much water does a leaky faucet waste?**
A: A faucet dripping once per second can waste over 3,000 gallons of water annually.
**Q2: What are the most common causes of a leaky faucet?**
A: Worn-out washers, O-rings, cartridges, and corroded valve seats are common culprits.
**Q3: Can I fix a leaky faucet myself, or do I need to call a plumber?**
A: Many faucet repairs are DIY-friendly, but complex issues or lack of confidence warrant professional help.
**Q4: How do I identify the type of faucet I have?**
A: Look at the handle configuration and mechanism (single-handle vs. two handles, twisting vs. lever action) to determine the faucet type.
**Q5: What tools do I need to fix a leaky faucet?**
A: Essential tools include adjustable wrenches, screwdrivers, pliers, and replacement parts.
**Q6: How do I turn off the water supply to the faucet?**
A: Locate the shut-off valves under the sink and turn them clockwise.
**Q7: What is plumber’s grease, and why should I use it?**
A: Plumber’s grease lubricates faucet components and prevents corrosion, extending their lifespan.
**Q8: How do I prevent future faucet leaks?**
A: Regular cleaning, periodic inspections, and prompt replacement of worn parts are crucial.
**Q9: What if I can’t remove a stuck faucet handle?**
A: Try using penetrating oil to loosen the handle or a handle puller tool.
**Q10: Is it better to repair or replace a leaky faucet?**
A: Repair is often more cost-effective for minor leaks. However, replacement may be necessary for severely damaged or outdated faucets.
Conclusion: Take Control of Your Leaky Faucet
Fixing a leaky faucet in the kitchen with easy DIY solutions is a manageable task that can save you money, conserve water, and prevent damage to your home. By following the steps outlined in this comprehensive guide, you can confidently tackle this common household problem. Remember to identify your faucet type, gather the necessary tools and materials, and take your time during the repair process. We’ve drawn upon our extensive experience and research to provide you with the most reliable and up-to-date information. Don’t let that drip drive you crazy any longer! Take control of your leaky faucet and enjoy a quieter, more efficient kitchen. Share your experiences with **how to fix a leaky faucet in the kitchen with easy diy solutions** in the comments below, and let us know if you have any questions. For more advanced plumbing tips and tricks, explore our other guides on home maintenance and repair.
