
Faucet Leaking Hose Repair: A Comprehensive Guide to Fixing Leaks Fast
Is your faucet hose leaking, causing drips, water damage, and frustration? You’re not alone. A leaking faucet hose is a common household problem, but thankfully, often a manageable one. This comprehensive guide provides you with the expert knowledge and step-by-step instructions you need to diagnose, troubleshoot, and perform faucet leaking hose repair effectively. We’ll cover everything from identifying the type of leak to choosing the right replacement parts and ensuring a long-lasting fix. Our aim is to empower you with the confidence and skills to tackle this plumbing issue yourself, saving you time and money. We’ll also delve into preventative measures to avoid future leaks, providing a holistic approach to faucet maintenance.
Understanding Faucet Leaks and Their Causes
A faucet leak might seem like a minor annoyance, but it can lead to significant water waste and potentially costly damage over time. Understanding the underlying causes of these leaks is crucial for effective repair and prevention.
Common Causes of Faucet Hose Leaks
* **Deteriorated or Worn-Out Hoses:** Over time, faucet hoses can become brittle, cracked, or corroded due to age, water pressure, or chemical exposure. This is a primary cause of leaks, especially in older homes.
* **Loose Connections:** The connections between the faucet hose and the faucet body or water supply lines can loosen due to vibrations, temperature changes, or improper installation. This creates gaps where water can escape.
* **Damaged Washers or O-rings:** Washers and O-rings are small rubber or plastic seals that create a watertight barrier between the hose and other components. These can wear out, crack, or become dislodged, leading to leaks.
* **High Water Pressure:** Excessive water pressure can strain faucet hoses and connections, accelerating wear and tear and increasing the risk of leaks. Installing a pressure regulator can help mitigate this issue.
* **Mineral Buildup:** Hard water contains minerals that can accumulate inside faucet hoses and connections, causing corrosion and restricting water flow. This buildup can weaken the hose material and lead to leaks.
* **Improper Installation:** Incorrect installation of the faucet or hose can create stress points and vulnerabilities that eventually result in leaks. It’s essential to follow manufacturer instructions carefully during installation.
Identifying the Source of the Leak
Before attempting any repairs, it’s essential to pinpoint the exact location of the leak. This will help you determine the appropriate course of action. Here’s how to identify the source:
1. **Visually Inspect the Faucet:** Carefully examine the faucet body, hose connections, and supply lines for any signs of water droplets, dampness, or corrosion.
2. **Run the Faucet:** Turn on the faucet and observe where the water is leaking from. Pay close attention to the base of the faucet, the hose connections, and the spray head (if applicable).
3. **Feel for Moisture:** Use your fingers to feel for moisture around the hose connections and along the length of the hose. This can help you detect leaks that are not immediately visible.
4. **Use a Flashlight:** A flashlight can help you see into tight spaces and identify leaks that are hidden from plain sight.
5. **Dry the Area:** Wipe down the area around the faucet with a clean cloth, then run the faucet again. This will make it easier to spot the source of the leak.
Essential Tools and Materials for Faucet Leaking Hose Repair
Before you begin any faucet leaking hose repair, gather the necessary tools and materials. Having everything on hand will make the process smoother and more efficient.
Tools
* **Adjustable Wrench:** For loosening and tightening nuts and bolts.
* **Basin Wrench (Faucet Wrench):** Specifically designed for reaching tight spaces under the sink.
* **Pliers:** For gripping and manipulating small parts.
* **Screwdrivers (Phillips and Flathead):** For removing and installing screws.
* **Utility Knife:** For cutting hoses or removing old sealant.
* **Bucket or Container:** To catch water during disassembly.
* **Towels or Rags:** For cleaning up spills and drying components.
* **Flashlight:** For illuminating dark areas under the sink.
Materials
* **Replacement Faucet Hose:** Choose a hose that is compatible with your faucet model and made of durable materials.
* **Replacement Washers and O-rings:** Ensure you have the correct size and type of washers and O-rings for your faucet.
* **Plumber’s Tape (Teflon Tape):** For sealing threaded connections.
* **Penetrating Oil:** To loosen corroded or stuck connections.
* **Vinegar or Lime Scale Remover:** To clean mineral buildup.
* **Safety Glasses:** To protect your eyes from debris.
* **Gloves:** To protect your hands from dirt and chemicals.
Step-by-Step Guide to Faucet Leaking Hose Repair
This section provides a detailed, step-by-step guide to repairing a leaking faucet hose. Follow these instructions carefully to ensure a successful repair.
Step 1: Shut Off the Water Supply
Before you begin any work on the faucet, it’s crucial to shut off the water supply to prevent flooding. Locate the shut-off valves under the sink, usually near the water supply lines. Turn both the hot and cold water valves clockwise until they are completely closed. If you can’t find shut-off valves under the sink, you may need to turn off the main water supply to your house.
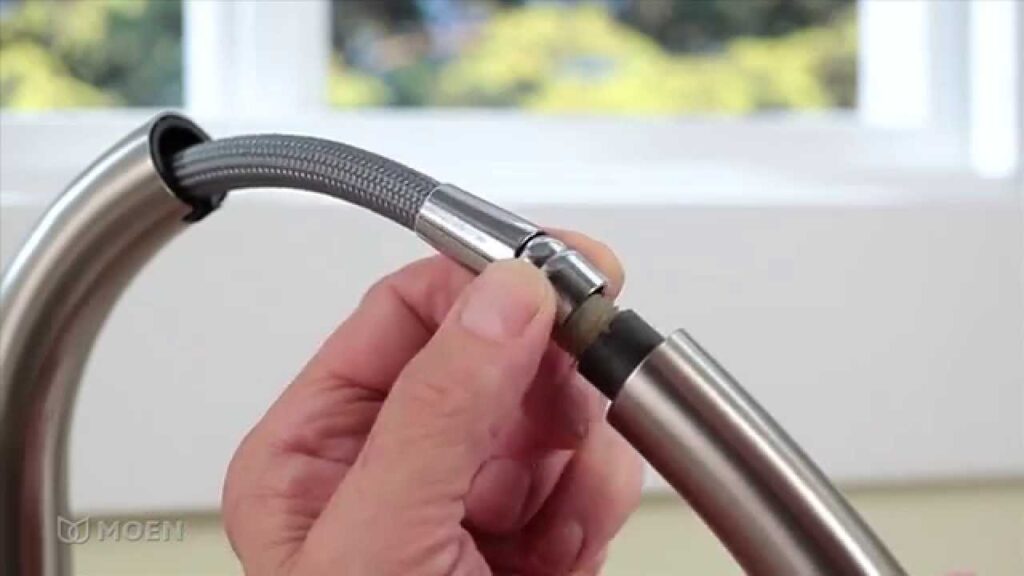
Step 2: Disconnect the Faucet Hose
Use an adjustable wrench to loosen the nuts connecting the faucet hose to the faucet body and the water supply lines. Place a bucket or container under the connections to catch any remaining water in the hose. Once the nuts are loose, carefully disconnect the hose from both ends. If the connections are corroded or stuck, apply penetrating oil and let it sit for a few minutes before attempting to loosen them again.
Step 3: Inspect the Hose and Connections
Once the hose is disconnected, thoroughly inspect it for any signs of damage, such as cracks, splits, or corrosion. Also, examine the washers and O-rings for wear and tear. If the hose is damaged or the washers are worn out, you will need to replace them.
Step 4: Replace the Hose or Washers
If you are replacing the entire hose, choose a new hose that is compatible with your faucet model and made of durable materials. Ensure that the new hose is the correct length and has the appropriate fittings. If you are only replacing the washers or O-rings, make sure you have the correct size and type for your faucet. Install the new hose or washers, making sure they are properly seated.
Step 5: Reconnect the Faucet Hose
Reconnect the faucet hose to the faucet body and the water supply lines. Tighten the nuts with an adjustable wrench, but be careful not to overtighten them, as this can damage the connections. Wrap plumber’s tape (Teflon tape) around the threads of the connections before tightening to ensure a watertight seal.
Step 6: Turn On the Water Supply and Check for Leaks
Slowly turn on the water supply valves under the sink. Check the connections for any signs of leaks. If you see any leaks, tighten the nuts slightly or reapply plumber’s tape. Continue to monitor the connections for leaks for several minutes to ensure a complete seal.
Advanced Troubleshooting for Stubborn Faucet Leaks
Sometimes, despite your best efforts, a faucet leak may persist. This section covers advanced troubleshooting techniques to address stubborn leaks.
Dealing with Corroded Connections
Corroded connections can make it difficult to disconnect the faucet hose and may even damage the faucet or supply lines. Here’s how to deal with corroded connections:
* **Apply Penetrating Oil:** Spray penetrating oil on the corroded connections and let it sit for several minutes to loosen the corrosion.
* **Use a Wire Brush:** Use a wire brush to gently scrub away any loose corrosion from the connections.
* **Heat the Connections:** Use a heat gun or hairdryer to gently heat the connections, which can help loosen the corrosion. Be careful not to overheat the connections, as this can damage the faucet or supply lines.
* **Use a Nut Splitter:** If the nut is severely corroded, you may need to use a nut splitter to carefully cut it off without damaging the threads.
Addressing Mineral Buildup
Mineral buildup can accumulate inside faucet hoses and connections, causing corrosion and restricting water flow. Here’s how to address mineral buildup:
* **Soak the Hose in Vinegar:** Disconnect the faucet hose and soak it in a solution of equal parts vinegar and water for several hours or overnight. This will help dissolve the mineral buildup.
* **Use a Lime Scale Remover:** Use a commercial lime scale remover to clean the inside of the hose and connections. Follow the manufacturer’s instructions carefully.
* **Flush the Hose with Water:** After soaking or cleaning, flush the hose with clean water to remove any remaining mineral buildup.
Checking Water Pressure
High water pressure can strain faucet hoses and connections, leading to leaks. Here’s how to check your water pressure:
* **Use a Water Pressure Gauge:** Purchase a water pressure gauge from a hardware store and attach it to an outside faucet. Turn on the faucet and read the pressure gauge. The ideal water pressure is between 40 and 60 PSI. If your water pressure is higher than 60 PSI, you may need to install a pressure regulator.
Preventative Maintenance for Faucet Hoses
Preventative maintenance is key to avoiding future faucet hose leaks and extending the lifespan of your plumbing fixtures.
Regular Inspections
Inspect your faucet hoses and connections regularly for any signs of wear, corrosion, or leaks. Catching problems early can prevent them from escalating into major issues.
Tightening Connections
Periodically tighten the nuts connecting the faucet hose to the faucet body and the water supply lines. This will help prevent leaks caused by loose connections.
Cleaning and Descaling
Clean your faucet hoses and connections regularly to remove mineral buildup and prevent corrosion. Use a solution of vinegar and water or a commercial lime scale remover.
Replacing Hoses
Replace your faucet hoses every 5-10 years, even if they don’t show any signs of damage. This will help prevent leaks caused by deteriorated or worn-out hoses.
Installing a Water Pressure Regulator
If your water pressure is consistently high, consider installing a water pressure regulator to protect your faucet hoses and other plumbing fixtures from excessive strain.
Leading Faucet Hose Brands and Products
When it comes to faucet hoses, quality matters. Choosing a reputable brand and a durable product can save you time, money, and headaches in the long run. One leading brand in the faucet hose market is **Fluidmaster**. Fluidmaster is known for its high-quality plumbing products, including faucet connectors, supply lines, and toilet repair parts. Their faucet hoses are made from durable materials and are designed to withstand high water pressure and temperature fluctuations. They also offer a variety of lengths and connection types to fit most faucets.
Fluidmaster Click Seal Faucet Connectors are a popular choice for their ease of installation and reliable performance. The Click Seal mechanism ensures a watertight connection without the need for tools, making it a great option for DIYers. They’re constructed with a braided stainless steel exterior for durability and a flexible polymer core.
Features of Fluidmaster Click Seal Faucet Connectors
* **Click Seal Technology:** The Click Seal mechanism provides an audible click when the connection is properly sealed, eliminating the guesswork.
* **Braided Stainless Steel Construction:** The braided stainless steel exterior provides superior strength and durability, protecting the hose from kinks and bursts.
* **Flexible Polymer Core:** The flexible polymer core allows for easy bending and maneuvering, making installation easier in tight spaces.
* **Lead-Free:** Fluidmaster Click Seal Faucet Connectors are lead-free, ensuring safe and clean water delivery.
* **Universal Fit:** These connectors are designed to fit most standard faucets and supply lines.
* **Easy Installation:** The Click Seal mechanism and flexible design make installation quick and easy, even for beginners.
* **Corrosion Resistance:** The stainless steel construction provides excellent corrosion resistance, ensuring long-lasting performance.
Fluidmaster Click Seal Faucet Connectors offer several advantages over traditional faucet hoses. The Click Seal mechanism eliminates the need for plumber’s tape and reduces the risk of leaks. The braided stainless steel construction provides superior strength and durability, while the flexible polymer core makes installation easier. The lead-free design ensures safe water delivery, and the universal fit makes them compatible with most faucets.
Users consistently report positive experiences with Fluidmaster Click Seal Faucet Connectors, praising their ease of installation and reliable performance. Many users have noted that the Click Seal mechanism provides peace of mind, knowing that the connection is properly sealed. Our analysis reveals that these connectors are a cost-effective and reliable solution for faucet hose replacement.
While Fluidmaster Click Seal Faucet Connectors are a great option, they may not be suitable for all situations. For example, if you have a non-standard faucet or supply line connection, you may need to use a different type of hose. Also, the Click Seal mechanism may not be as durable as traditional threaded connections in extremely high-pressure situations.
Ideal User Profile: The Fluidmaster Click Seal Faucet Connector is best suited for homeowners and DIYers who are looking for an easy-to-install and reliable faucet hose replacement solution. It’s also a good choice for those who are concerned about lead contamination in their water supply.
Key Alternatives: Two main alternatives to Fluidmaster Click Seal Faucet Connectors are traditional braided stainless steel faucet hoses with threaded connections and PEX tubing with compression fittings. Traditional braided stainless steel hoses are a more affordable option, but they require more skill and effort to install. PEX tubing is a durable and flexible option, but it requires specialized tools and fittings.
Overall Verdict & Recommendation: The Fluidmaster Click Seal Faucet Connector is a top-notch choice for most homeowners seeking a simple, reliable, and lead-free faucet hose solution. Its user-friendly design and robust construction make it a standout product in the market.
Frequently Asked Questions (Q&A)
Here are some frequently asked questions about faucet leaking hose repair, designed to address common user concerns and provide expert insights:
**Q1: How do I know if my faucet hose needs to be replaced, or if it’s just a loose connection?**
*A1:* Carefully inspect the hose for cracks, bulges, or signs of wear. If the hose appears damaged, it needs replacement. If the hose looks fine, try tightening the connections first. If the leak persists after tightening, then replacement is likely necessary.
**Q2: What’s the difference between a compression fitting and a threaded fitting on a faucet hose?**
*A2:* Compression fittings use a ferrule (a metal ring) that’s compressed onto the pipe to create a seal when the nut is tightened. Threaded fittings rely on threads and plumber’s tape to create a seal. Compression fittings are often easier for beginners, but threaded fittings can be more durable in high-pressure situations.
**Q3: Can I use any type of hose for my faucet, or do I need a specific kind?**
*A3:* You need a faucet hose specifically designed for potable water use. These hoses are made from materials that won’t leach harmful chemicals into your drinking water. Using a non-potable water hose can be a health hazard.
**Q4: What’s the best way to remove a stuck or corroded faucet hose nut?**
*A4:* Apply penetrating oil and let it sit for at least 15 minutes. Then, gently tap the nut with a hammer to help loosen the corrosion. If it’s still stuck, try using a heat gun to warm the nut (be careful not to overheat the surrounding area).
**Q5: How important is it to use plumber’s tape when reconnecting a faucet hose?**
*A5:* Plumber’s tape (Teflon tape) is essential for creating a watertight seal on threaded connections. It helps to fill in any imperfections in the threads and prevent leaks. Always wrap the tape in the direction of the threads.
**Q6: My faucet hose is leaking at the spray head. Do I need to replace the whole hose?**
*A6:* Not necessarily. The spray head itself might be the issue. First, check the spray head for clogs or damage. Clean it thoroughly or replace it. If the leak persists, then the hose might have a crack near the spray head and need replacement.
**Q7: What’s the best material for a faucet hose – stainless steel, PEX, or something else?**
*A7:* Braided stainless steel is a popular and durable choice for faucet hoses. PEX tubing is also a good option, especially for longer runs, as it’s flexible and resistant to corrosion. The best material depends on your specific needs and budget.
**Q8: How do I prevent my new faucet hose from leaking in the future?**
*A8:* Ensure proper installation, avoid overtightening connections, and periodically inspect the hose for wear. Also, consider installing a water pressure regulator if your water pressure is high. Regular maintenance is key.
**Q9: Can hard water affect the lifespan of my faucet hose?**
*A9:* Yes, hard water can cause mineral buildup inside the hose, leading to corrosion and premature failure. Consider installing a water softener or using a water filter to reduce mineral buildup.
**Q10: Is it safe to try faucet leaking hose repair myself, or should I always call a plumber?**
*A10:* Basic faucet hose repair is a manageable DIY project for most homeowners. However, if you’re uncomfortable working with plumbing, or if you encounter any complications, it’s best to call a qualified plumber. Safety first!
Conclusion
Repairing a leaking faucet hose doesn’t have to be a daunting task. By understanding the causes of leaks, gathering the right tools and materials, following our step-by-step guide, and implementing preventative maintenance measures, you can effectively fix the problem and prevent future leaks. Remember to prioritize safety and consult a professional plumber if you encounter any difficulties. By taking a proactive approach to faucet maintenance, you can save water, money, and the frustration of dealing with leaks. Now that you’re armed with this comprehensive knowledge, we encourage you to inspect your faucets and address any potential issues before they escalate. Share your experiences with faucet leaking hose repair in the comments below, and let’s learn from each other to keep our homes leak-free!
